|
Leica DG 8-18 mm F/2.8-4.0 Lens Report |
|
| My other articles related to the Olympus OM-D System. |

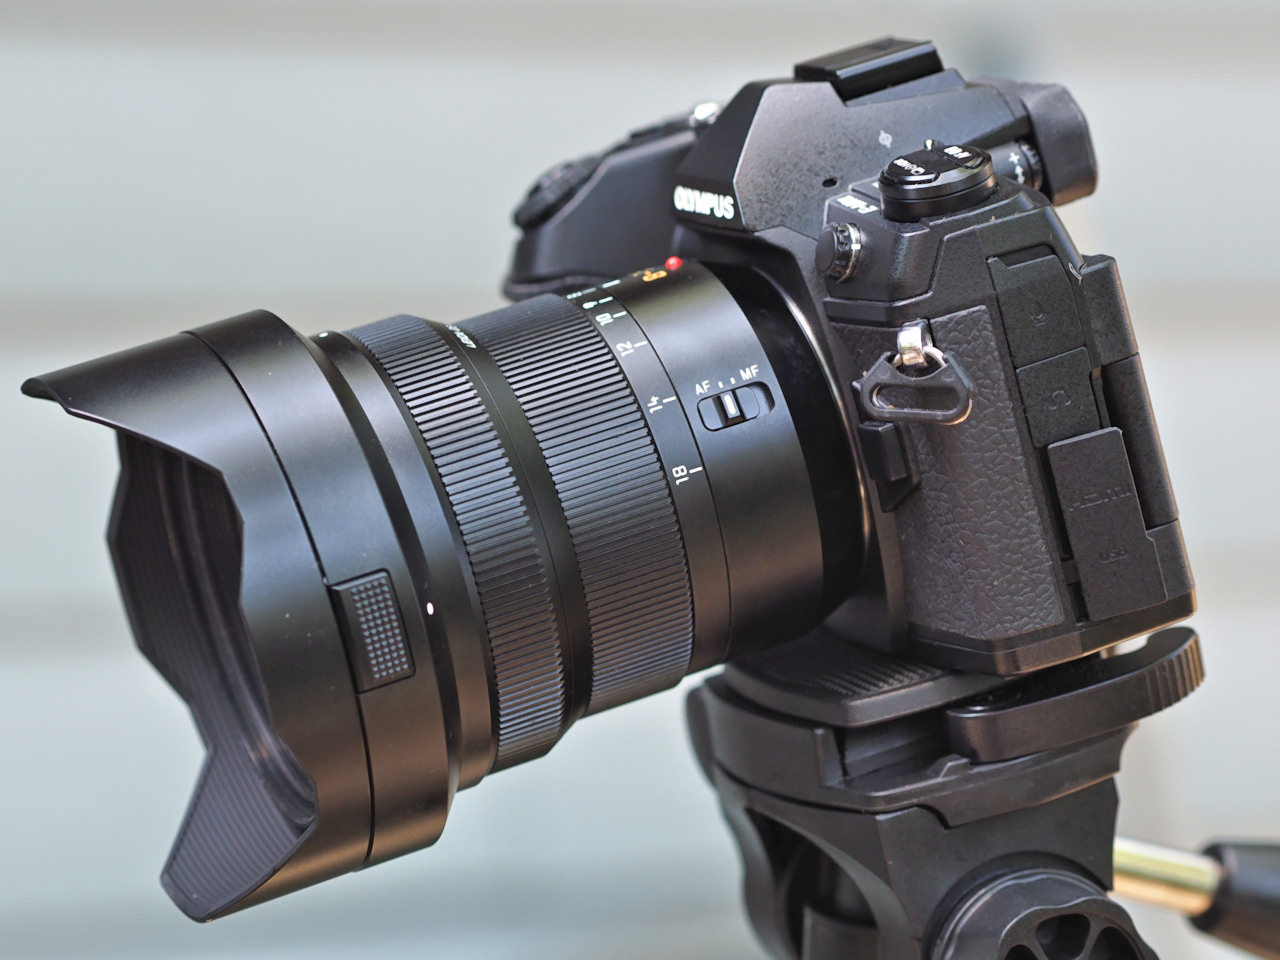
F = 8 mm, Aperture priority (-.3 EV): 1/5 s at F/2.8 |

F = 18 mm, Aperture priority (-.3 EV): 1/2 s at F/4.0 | |
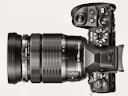
Olympus OM-D E-M1 Mark II with Leica DG 8-18/2.8-4.0 lens | ||
This, indeed, looks like a costly lens to make.
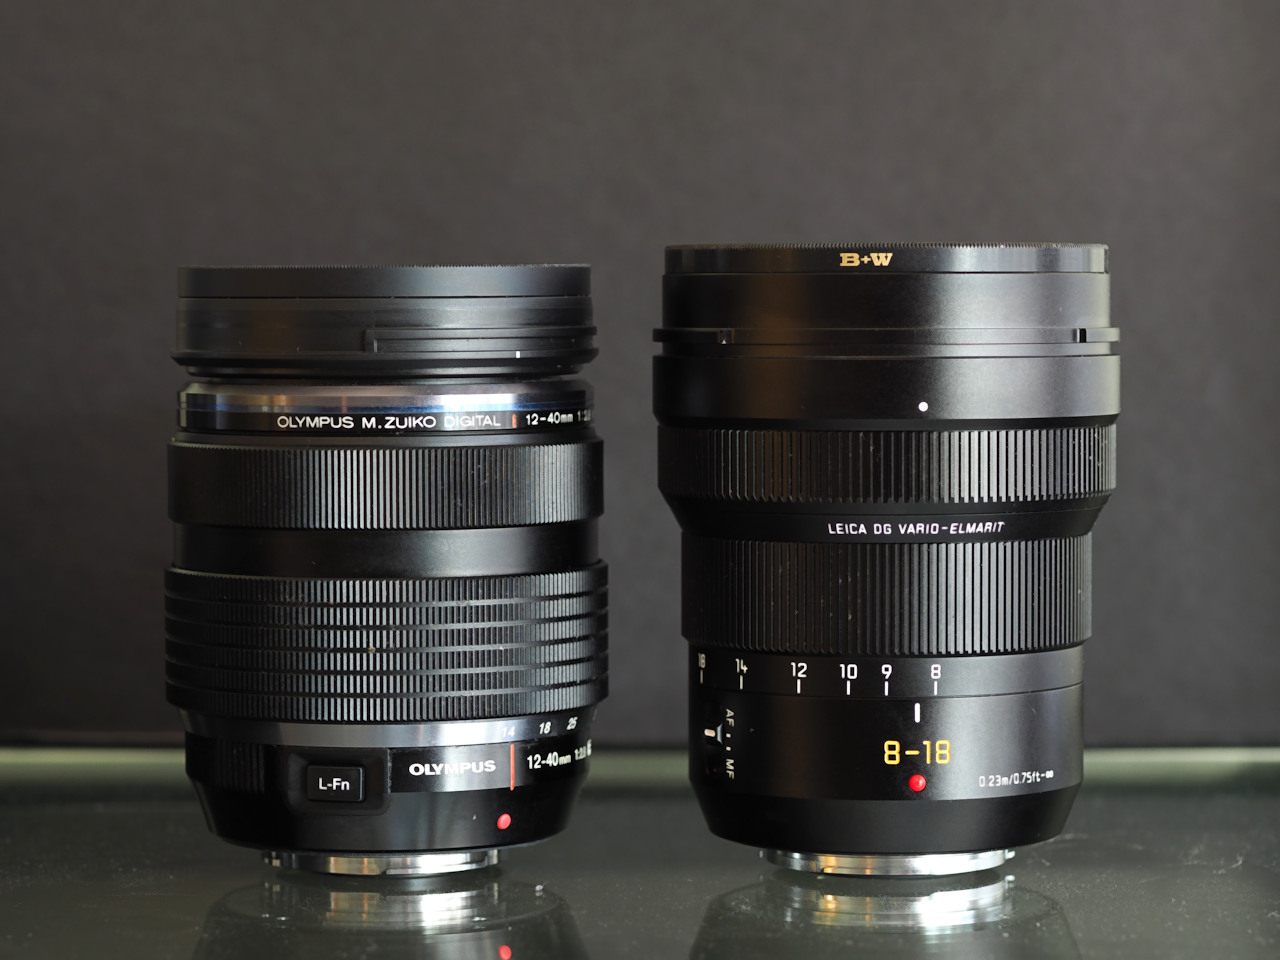
| The lens uses Nano Coating (which is just a nice-sounding, meaniningless term); it is supposedly better than whatever coating Panasonic was using before, and I believe that. The aperture has seven blades, and they are of rounded shape, which should provide more pleasing out-of-focus rendition.
| 
(Drawing by Panasonic) | |
| ||||||||||||||
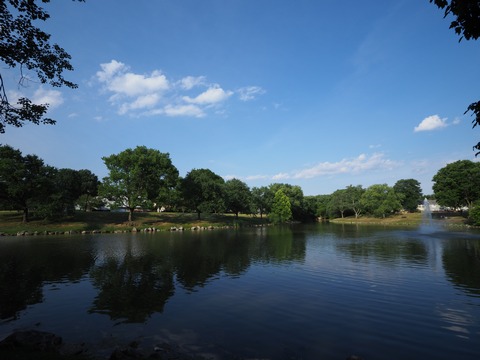
| Olympus E-M1 II, Leica DG 8-18/2.8-4 at 18 mm; AP (0 EV): 1s at F/7.1, ISO 200, Auto WB, IS on | ||
Whole frame, reduced |

1:1 sample from frame at left |

1:1 sample from another frame |
|
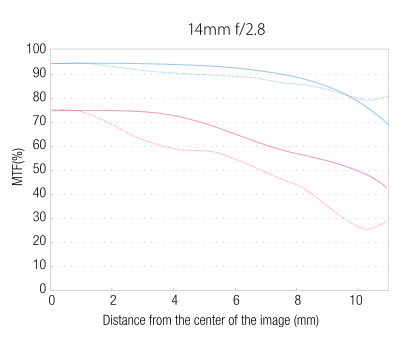
Performance: the MTF data I found two MTF graphs for this lens, published by Panasonic: full aperture at both extreme focal lengths. If you are not familiar with MTF graphs, then perhaps have a look at my small article on this subject. I am also explaining there, why I consider the MTF graphs in this form not very useful for lens performance description.
| This is, however, what we have here and now. Blue lines correspond to a frequency of 10 LP/mm (this can be loosely interpreted as a measure of contrast), while green ones — 20 LP/mm (sharpness). Then, solid lines are for sagital, and dotted for tangential (meridional) patterns.
| 
| In similar circumstances, blue (contrast) lines stay above 90% up to x=6 mm at least, for a good lens. This is easily exceeded here for both focal lengths, an excellent result.
For comparison, here are similar graphs for the MZD 7-14/2.8 at
For the green (sharpness) lines, things are less clear. Many manufactures, including Olympus, use here a frequency of 30 LP/mm; Panasonic — 20 LP/mm (that's what their "40" means), which makes the data directly not comparable. Still, it is often assumed that for 30 LP/mm the strong performance region starts at 80%, and for 20 LP/mm — below 90%. As the Leica lens meets both these requirements, we can expect from it a very solid show. Note that the lines start to drop off quite far to the right, above 8 mm or more. 8.65 mm is half-width of the frame. This means that loss of resolution/contrast really starts at that boundary, also a good sign.
Actually, based on MTF data alone I would expect the Leica | ||
|
The light fall-off (or vignetting) is an effect seen mostly with wide-angle lenses, especially at full apertures. It shows itself as gradual darkening of image areas away from the center. Some of it is due to the lens itself, some to the directional response of the sensor, and some — just to geometry. Lens and camera engineers may try to reduce the magnitude of the first two parts, but they can do nothing about the third one (except for moving the lens away from the sensor). At an angle of 33°, light becomes only half as effective as at zero; at 45° — four times less effective. A correction for vignetting is available as an option on most cameras. In Olympus ones it has to be explicitly enabled, found in the menu tree as "Shading Compensation". Various implementations may differ in when (at which processing stage) the correction is applied. This may range from the raw photosite response to the full RGB pixel information, but the general principle remains the same: amplifying the response at each point, depending on where in the frame this point is (of course, for many points the multiplier will be 1, so those are left alone). And if you amplify the signal, you also amplify the noise in that area. This is the price we pay. Interestingly, in Olympus cameras of the last ten years or so, the correction seems to be applied during analog-to-digital conversion of the photosite signal (not even at the raw-to-RGB stage), so that the raw files are affected. This is indicated by the fact that the Auto Shading Compensation option in Olympus Viewer is disabled for raw files produced with the in-camera correction active. The most vignetting you are going to see with this lens will be at 8 mm, between F/2.8 and F/3.5 or so (there is no improvement going from F/4.0 to F/5.6). Have a look at these two reduced-size images (or, if you wish, full frames).
|
Olympus E-M1 II, Leica DG 8-18/2.8-4.0 —
No vignetting correction
|
|
| 
8 mm, F/2.8 — [full frame]
| 
8 mm, F/4.0 — [full frame]
| Looking closely at these samples (by flipping them in an image browser; otherwise it is hard to see anything), I can see that the vignetting here is not really heavy (dark), but it is quite extensive, taking a large share of the image area. This is different than on many lenses I've seen, where the effect starts only at distances beyond frame half-width, rising fast towards corners. Quite interesting: the metering system exposed both frames identically, basing its decision on the central 1/3×1/3 (or 10%) of the image area, where vignetting does not reach. More, a subtle vignetting effect may enhance a photograph, adding an extra accent on the central subject area and de-emphasizing the peripheries. I really like the effect and would rather keep it, for some applications at least.
|
| 
12 mm, F/3.4 — [full frame]
| 
12 mm, F/4.0 — [full frame]
| At 12 mm the full aperture is F/3.4. There is less vignetting, but it is still of the same gently-sloped type. All is gone just 1/3 EV down the road, at F/4.0. No discernible vignetting at 18 mm. The results with in-camera correction enabled were as expected: no vignetting, except at 8 mm, F/2.8, where about half of the effect went away. Wide-angle lenses generally suffer from a problem of image magnification changing with the distance from the axis. This leads to barrel- or cushion-like distortion, especially visible in long lines, parallel and near to the image edges. The shorter the focal length, the more difficult is this effect to avoid. In fisheye lenses, designers give up on trying to correct the distortion, focusing on other optical flaws instead. This lens, however, is rectilinear, supposed to keep straight lines straight. Distortion, however, is (like vignetting and, partly, chromatic aberration) not so difficult to remove after the exposure: for a given, known lens its behavior is predictable. If some point of the subject is rendered at a point P of the image, we can calculate the point Q at which it should be rendered so that the image is not distorted. Then we can move the RGB information from the pixel at P to the pixel at Q; if we do that for the whole image, the result will be distortion-free. I'm simplifying things here — but not by much. Moving the pixel RGB information from P to Q can be replaced with interpolation or combined with demosaicing of the RGB matrix, but the basic principle stays the same. Olympus and Panasonic chose to go this way. Some of their lenses provide only a most rudimentary degree of correction for geometric distortion, and most of work is done in image processing. There are three degrees of distortion correction in μFT lens/camera combinations:
The Distortion Experiment Let us see how this works for our lens. I've shot two series of pictures, each for a scene including a straight line, going through the whole frame width, close and parallel to its top. For each picture, I read three distances, all measured vertically from the frame top:
We also need to know the value of h, half of frame height; for μFT (20 MP) it equals 1944 pixels. The so-called "new" SMIA TV Distortion can be then computed as
D = 100% × (b-(a1+a2)/2) / (h-b)
I was saving both raw and JPEG files, so for every shot (focal length) I could generate images in all three correction flavors and compute the distortion as shown above. Scene 1: Roof Line This was shot from a distance of about three meters; four focal lengths were covered. The first numbers I've got were the ones for in-camera JPEGs. They looked so typical for a high-quality super-wide zoom, that I was going just to make a statement to that effect an close the matter. Only then I remembered the controversy about fixing lens flaws in software. Time to start digging! Running the raw files through Olympus Viewer confirmed my understanding of the Basic and Post distortion correction and demonstrated that the "hidden" part used in-camera is identical to that in Viewer.
The table shows complete results for that session. The line for uncorrected results is quite shocking. If you would like to know what eight-percent distortion means, have a look at the pictures below, where the Optical version with -8% is compared against Basic with -1.6% (done in-camera). | |||||||||||||||||||||||||||||
.t.jpg)
8 mm, Optical Saved as ORF; converted to RGB in ACDSee, default settings. |
.t.jpg)
8 mm, Basic Converted to RGB and saved as JPEG by the camera. | |||||||||||||||||||||||||||||||
|
And that's the controversy I was talking about. Should the lens quality be judged by the first picture, or by the second one? Should we consider this cheating? We will come back to this later. Note another effect: some areas of the original, captured image are missing in the final version (the yellow container, chair at far left). Obviously, correcting for distortion affects the effective angle of view, or the effective focal length. Scene 2: TV Screen The subject of my second scene is a large-screen TV. Six focal lengths were covered this time. In order for the top edge of the screen to fill the frame width, I had to get closer: this time about 50 cm from the subject.
Distortion depends on the subject distance, and the numbers seem to confirm that. Still, the general pattern remains the same: huge distortion at wider angles without software correction, greatly cleaned up with Basic processing. The effects of Post correction at a close distance don't seem to make much sense. No big loss: I'm happy with the Basic in-camera results. Which distortion? So, which one of these three values should I use to judge the performance of this lens with regard to geometric distortion? As a systems engineer, I would opt for the second one (Basic), treating the lens+camera combination as a black box with some kind of standard, no-hassle output. Therefore I stick to my middle numbers shown in the tables above. Why don't the designers opt for a complete removal of distortion in one step? I think the reason is the computational complexity. The Basic approximation calculations, applied in-camera, have to be fast. Whatever is not fast enough must be left for postprocessing. Interestingly, the viewfinder image seems to be largely free of distortion. This means some correction is applied to it in real time, 120 times a second! (Some tricks could be used to cut this frequency down, but it still has to be fast.) I wonder whether this is the full Basic correction, or another level, simpler and faster. I consider the former quite feasible: after all, they already do raw-to-RGB conversion real-time, and most of the correction algorithm is (the way I understand it) just substitution of pixel index values with shifted ones. Because most of distortion is now handled in the software (and so is most of chromatic aberration, a very similar story), the lens may be now designed to address some of the other aberrations more efficiently. EVF correction In the last section I wasn't sure how much of distortion is corrected in the viewed image, real-time. Is this the full Basic correction, or something quick-and-dirty, just to keep up with the finder refresh rate? | ||||||||||||||||||||||||||||||||
|
I could try to take a picture of the finder (or monitor) and apply to it the method used above, but that would be cumbersome and inaccurate. There is a better way: using the Olympus Capture application, which allows you for real-time preview on a computer screen. Capture the screen and measure whatever you wish (units don't matter as long as the same one is used everywhere in the formula; here I was using pixels of the capture screen),
I am assuming here that both the EVF and Capture show images from the same source, just differently rescaled. Of this, however, I am 100% sure: it would be just stupid (and difficult) to do it any other way. |

| |||||||||||||||||||
|
Anyway, all I have to do here is to measure the width of the greenish strip at the top, in three points, and also the height of the whole window. For a focal length of 8 mm my result is -0.76% (with a reasonable error estimate of 0.2% and worst-case scenario of 0.4%). For the in-camera (Basic) correction this time the value was -0.92%, and for uncorrected image, -6.84% (both close to results from a few days ago). So the answer to our question is: Yes, the camera corrects the viewfinder image for geometric distortion, and it is the same (amount of) correction as that applied in standard image processing. (Now, try to do it with your SLR!) Before we move to the next topic, let's have some gloating time. Here is the top fragment of the image (whole frame width), taken from three different sources and resampled to have all three in the same magnification (while fitting my page layout).
|
| Correcting the image for distortion can lead, as we could see, to some reduction in image angle. We may talk about increasing of the effective focal length.
That focal length can be indirectly measured (with some extra error margin due to missing information about positioning of lens principal planes), so I did that. At the wide end, my results were between 8.15 and 8.30 mm, depending on distance, with a possible error ±0.1 mm — fairly close to the nominal Chromatic aberration My lake samples don't show any of that effect. It is handled, I believe, partly by the lens itself, and partly in the software converting the raw data to RGB. Not that it matters, but just for the sake of curiosity I wanted to see how much of it does the lens leave for the software to handle. The Olympus Viewer has an option to adjust this correction in two color dimensions, within ±100 units (Monopoly money) from defaults marked as zero — but because they are defaults, they can't mean "no correction", obviously, so using the Viewer I would be clueless to what I'm doing. I used the ACDSee again, as it has an explicit option to turn off chromatic aberration fix. This is how I generated a few uncorrected images out of ORF files, saved when working on the lake scene. Here I'm showing an off-axis sample from such uncorrected image next to one extracted from an in-camera, corrected JPEG.
|
F = 8 mm; AP (-.7 EV): 1/3200 s at F/2.8, ISO 200, WB 5300K
|
|
| .f.jpg)
Converted in ACDSee, no correction
| 
Converted in-camera, default correction
| While the uncorrected version shows some green or purple fringes on high-contrast lines, the effect is very moderate with this pixel density and could be left uncorrected just fine; still, it disappears in the camera-processed image. Note how both samples differ in magnification, in spite of coming from the same original capture. This is because the uncorrected version suffers from significant negative distortion: the magnification decreases away from the center. Image samples At present, I have four image sample sets available for this lens:
All sets show what I consider to be among the best optical performances I've seen on the E-M1 II. This is especially important in case of the lake set, being harder for the lens and camera to resolve at some image areas, but the high-res images really show off what this lens can do. I'm hoping to add two or three more sets to the collection, to get a better feel of this lens' capabilities. The Bottom Line I'm not going to rush into any strong conclusions. So far I can say that performance-wise this lens is close to the top of what I've used within the μFT environment and, specifically, with the E-M1 Mk.II. How close behind, or how close ahead, I won't dare say yet. Make and finish, size and weight, and filter compatibility make it even more attractive for many uses. In a tandem with the 12-100/4.0 Pro, it may become my general-use zoom travel kit. Let me think about it for a while.
Other information sources Usually I wait with this section until I am (at least roughly) done with a report, so that reading someone else's opinions does not affect mine. So far I only found three pieces on the Web with some actual information on the lens, beyond rephrasing of manufacturer's statements. Here they are.
| ||||||||||||
|
| My other articles related to the Olympus OM-D System. |
|
Olympus® is a registered trademark of Olympus Corporation.
This page is not sponsored or endorsed by Olympus (or anyone else) and presents solely the views of the author. |
| Home: wrotniak.net | Search this site | Change font size |
| Posted 2017/06/26; last updated 2017/11/13 | Copyright © 2017 by J. Andrzej Wrotniak |

.jpg)
.jpg)
.jpg)
![[full frame]](_img/smp/em1.2-008-018/v0818-08-28-0.jpg)
![[full frame]](_img/smp/em1.2-008-018/v0818-08-40-0.jpg)
![[full frame]](_img/smp/em1.2-008-018/v0818-12-34-0.jpg)
![[full frame]](_img/smp/em1.2-008-018/v0818-12-40-0.jpg)
![[full frame]](_img/smp/em1.2-lake/008-018-008-028(ac).jpg)
![[full frame]](_img/smp/em1.2-lake/008-018-008-028.jpg)