Olympus C-60: a Technical Review

This is an in-depth, semi-technical review of the compact, clamshell C-60Z camera (on some markets known as X-3), from Olympus. It may be of help to an investigative Reader who is looking for a pocketable, simple to use, yet capable, versatile, and advanced digital camera.

If you do not feel like delving into in-depth details, and if you trust me (you shodn't, your needs and taste may be different!), you may jump straight to my conclusions. A separate page shows some C-60 image samples.

Introduction

For the last two years my wife has been using an unassuming, two-megapixel Olympus D-520 digital camera. She was getting very pleasing results out of it, so I had to convince her about upgrading to a newer, more powerful model before this year's vacation trip to the Sequoias, Yosemite, and Death Valley.

As a photographer, my wife is a mixed case. On one hand, she has a keen eye and good sense of composition, placing her at least at the intermediate-amateur level. On the other, she is not a technically-oriented person at all, not willing to deal with shutter speeds and aperture values, or to dig into the camera's menu system to adjust other parameters.

Therefore the choice of model to buy proved not to be an easy task. We've settled down on four groups of decisive factors:

  1. General class and form factor: small size and weight, easily fitting into a pocket, purse, or belt pouch; good build quality, optical viewfinder;
  2. Specifications: at least a 3x zoom range, four megapixels (which is plenty for all but most demanding applications);
  3. Image quality: good lens and CCD image rendition, effective autoexposure, good colors;
  4. Controls and user interface: not overwhelming, yet, if needed, providing access to all important functions and adjustments.

In the last group we've paid special attention to the ease of quick exposure adjustment (darker/brighter) for individual pictures. I feel this to be very important, as many of the beginners' (and not only) pictures suffer from the wrong (auto) exposure setting: burned-out highlights or loss of detail in shadows.

A camera (regardless of sophistication and price range) does not know whether your subject is a pile of dark ash, or a bright sand dune. In both cases the exposure will be set to some medium-gray level, yet you would like to have the ash pile dark, and the dune — bright. If you understand this, using exposure compensation as needed, your pictures will instantly become better, especially with the instant image review allowing you to check the results and re-shoot the picture if needed.

After having a look at all the models on the market we realized we had a lot of homework to do. Actually, it took us two weeks to get the job done. We extensively used the "big", established digital camera review sites here: what they may lack in depth and detail, they make up in completeness and promptness of information. The sites were: DP Review, Steve's Digicams, DC Resource, and Imaging Resource.

First, we identified about 20 models from five different makers to choose among, based on the first group of factors identified above: general camera type and form factor.

From these, we eliminated models with specifications or controls did not meet our requirements.

For the cameras left in our short list we went through the most tedious step: scrutinizing the image samples posted in the reviews. This was perhaps the trickiest point, as the quality of a sample image depends not only on the camera itself, but also on how it was used. Also, one has to keep in mind, that the goal is not to choose the best image quality, but just one good enough for our intended uses of the camera; above some level further quality increase may be wasted. As a source of samples, the Steve's Digicams is hard to beat for more than one reason.

Among factors we looked at in sample comparison were: lens sharpness, color fidelity, chromatic aberration and/or color fringing, vignetting in the corners (a real plague in this camera class!), and some others. For the reasons mentioned above we were not paying much attention to the autoexposure accuracy.

Frankly, we were a bit surprised with the results of the image quality check. We were expecting all cameras to provide images which are good enough; some, however, turned out to be very, very disappointing. In general, this stage prompted us to take into the final consideration only models from Canon, Nikon, and Olympus. Oh, yes, Sony models were also consistently good, but we excluded Sony for a number of other reasons beyond the scope of this article.

The last part of our comparison could not be done on the Internet. We had to drive to a number of stores and to handle the cameras which made it up to this point. If the camera does not feel right in your hands, or if the control placement is not the way you like it, no specifications will help. Also, this is the only way to check the quality and size of the optical viewfinder. (We were surprised to see, that the viewfinder magnification in the "new, improved" compact models from Nikon is smaller than in the models being replaced; an obvious sign of corner-cutting.)

At the end, we came down to two models: Canon Powershot S-60 (the S-50 which this one replaces is equally good) and Olympus C-60. And the choice between these two is tough.

The Canon S-60 has a lens quality far above that of any other compact model on the market, and its zoom range starts at 28 mm EFL. It accepts a tele lens attachment, and has a number of extra features which will delight an advanced enthusiast photographer.

Still, we decided in favor of the Olympus C-60. My wife found it easier to handle and use (not only because of being familiar with another Olympus model), and the camera is smaller than the Canon. While the lens is clearly not as good as Canon's, it is good enough. Most importantly, however, the C-60 allows you to change the exposure compensation with just one press of a button (no need to go into the menu system), and we find this to be of utmost importance.

So, for better or worse, C-60 it is. This review, very slow in coming (in Summer I'm busy taking pictures, not writing about them), is based on our three-month experience with the camera, including a vacation trip to California, with the total of more than 1000 frames taken. Here it goes.

Annotated walkthrough

Body

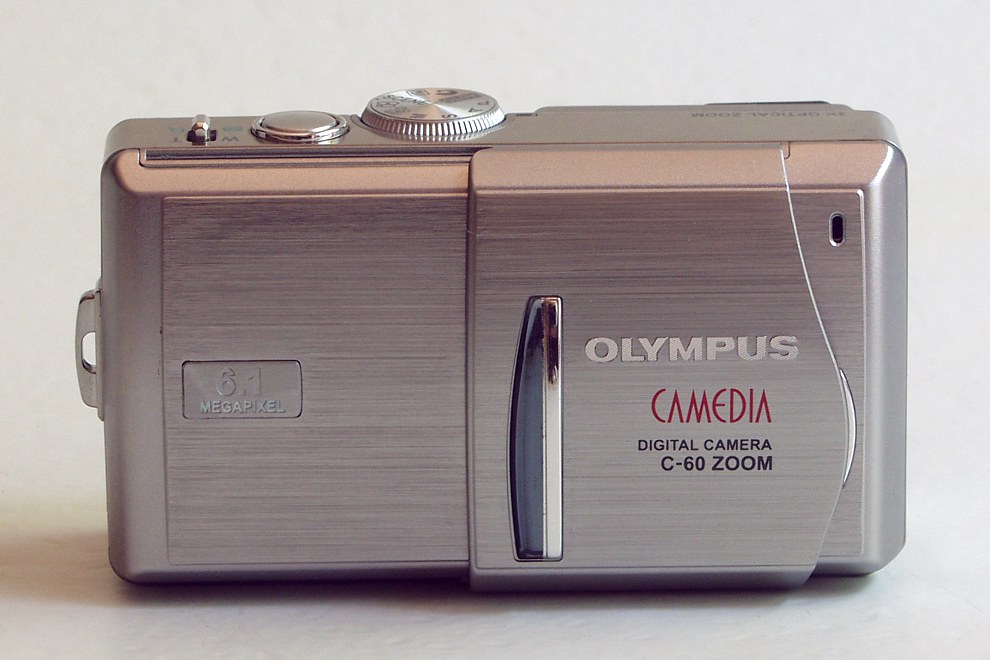
Finish: Brushed steel with some plastic covers, plastic lens barrel.

The standard, 1/8" tripod socket looks like made of metal; it placed close to camera's gravity center (i.e., not on the lens axis).

Size (WHD): 100x59x42 mm.

This is quite small. For comparison, the clamshell, entry-level Olympus D-580 has dimensions of 108x58x37 mm, while the Canon S-60 — 114x57x39 mm.Note that the C-60 is somewhat thicker than the other two models, while being shorter (the difference is more visible than the numbers may indicate).

Weight: 194 g without batteries.

About 20% less than Canon S-60 (230 g), or 20% more than the D-580 (165 g). About right for this size, with a solid, non-plasticky feel.

Index

Lens

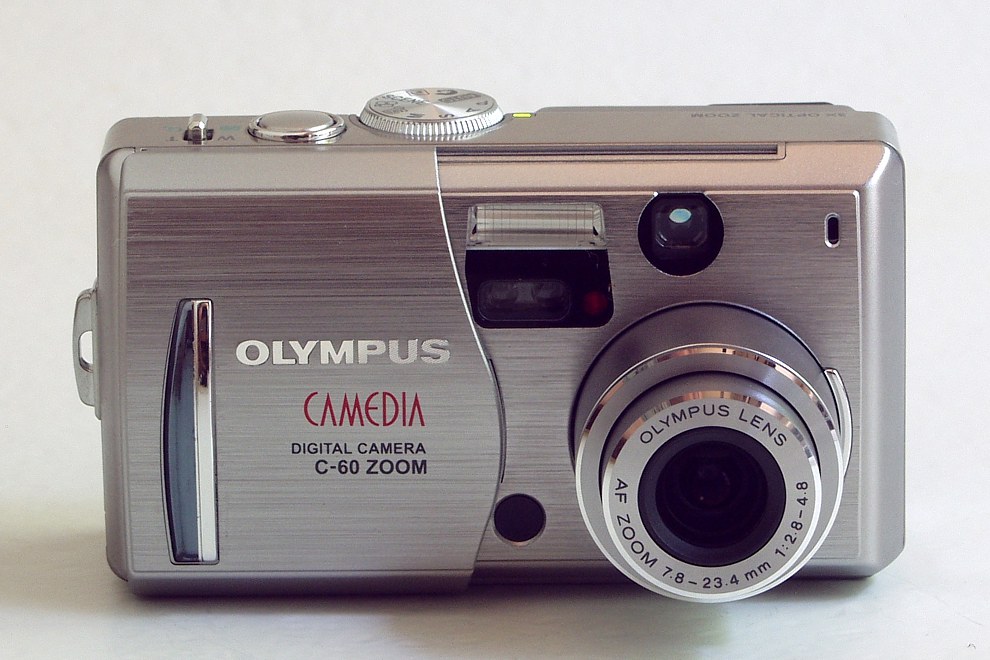
Focal length: 3x zoom range, 7.8-23.4 mm, equivalent to a 38-114 mm lens on a 35 mm camera.

I would love to see a somewhat wider lens here. Even a 35-105 mm EFL would make a difference (while keeping the 1:3 zoom range), not to mention the excellent 28-100 mm EFL range sported by the Canon S-60. I suspect the choice was made based on cost effectiveness, with most of mass market ignorant enough not to care about wider angles.

Aperture range: F/2.8 to F/8 at 38 mm EFL; F/4.8 to F/8 at 114 mm EFL; adjustments in 1/3 EV steps.

While I'm not thrilled with more than 1 EV difference between the short and long end, this is normal in compact, collapsible lenses, take it or leave it.

Optical construction: All-glass, multicoated, 7 elements in 6 groups, 2 aspherical surfaces.

It remains unclear if any low-dispersion elements are used in the lens. The construction seems quite simple (which is normal in this type of lens), but it seems OK for the job.

Aperture: Iris type, adjustable in 1/3 EV steps.

A fully-functional aperture — no corner-cutting here. Many compact models limit the aperture choice to just two values: smallest and largest, with nothing in-between.

Mechanical: Collapsible construction, two-part plastic barrel.

The lens folds flush with the body front when the camera is powered off, protruding 2.5 cm when fully extended. Only the nested, inner barrel moves during the zooming process, and that only by a few millimeters.

Both barrels exhibit some wobble when extended, although I wasn't able to see that affect the optical quality of the image. (This seems to be common, and not limited to clamshell cameras: Olympus' own C05050Z and C-5060WZ also show similar behavior.)

Obviously, the lens does not provide any means to attach filters, and this is not expected in this camera class.

Zoom control: Electric motor, lever-activated.

Normal among compact cameras; a collapsible lens has to be zoomed this way, like it or not. The lever is placed next to the shutter release on the top plate; I find this more convenient than a thumb-operated switch on the back.

Some reviewers complain about the short throw of the zoom lever; I find it no worse than other solutions I've tried, and so does my wife, the designated user of the camera.

Zooming seems to work in a number of 20 or so discrete steps, which is adequate.

Index

Optical viewfinder

Type: Real image; zooming in synch with the lens.

This is a large and bright viewfinder for a clamshell model (if not in absolute terms). It is almost exactly the size of the viewfinder in the C-5060WZ, a much larger camera; significantly larger than in all competing models we've tried. Do a side-by-side comparison with the Nikon Coolpix 5200 to know what I mean.

A significant barrel distortion is visible at the wide end, but I don't consider this a problem.

Field coverage: Not specified.

My estimate is 85% x 85% (WxH) at both extremes of the zoom focal length. This means less than 70% area coverage — in other words, more than 30% of your picture is outside the viewfinder; what you see is just the central four megapixels of the image.

I consider this a disadvantage, shared with practically all other optical-finder cameras (maybe with the notable exception of the posh Epson/Cosina model, which yet has to show on the market, but that is a non-zooming finder.) In fact, most of compact cameras I've seen offer even less finder coverage.

This is market-driven, of course. Most camera buyers will ask about the number of megapixels (regardless of what they really need), while practically nobody cares how much of your picture, just being taken, you can actually see. Sad.

Parallax correction: None.

Not in a clamshell model, of course. Actually, we have yet to see this feature in any other optical viewfinder on the market, clamshell or not. While parallax correction is not a trivial design for zooming finders, it certainly is possible — except that the market does not seem to care.

Information shown in finder: None.

There is a central cross (which I find useless), and two LEDs next to the eyepiece signal focus OK, and a need for flash.

I would prefer to have these indicators inside the finder, as their functionality is duplicated in the LCD screen.

Diopter correction: none.

While I understand space concerns, diopter correction would be welcome, and not only by middle-aged users. Luckily, the C-60 does not require you to press your eye against the eyepiece, so glass-wearers are not at a disadvantage.

Index

LCD monitor

Type: Color: active matrix (TFT).

A new technology is used for better outdoors visibility, additionally helped by anti-reflective coating (until recently, absent in Olympus cameras). In general, this is a very good monitor, visibly better than one used in the C-5060WZ or C-5050Z.

Physical size: 27x37 mm; 46 mm (1.8 in.) diagonal.

Larger than average (1.5") for this type of camera, although some models go up to 2 inches and more (often at the cost of giving up the optical finder, though).

Pixel count: 134k pixels (slightly bigger than 400x300).

This is rather good. Many competing models offer only 80k pixels in their monitor, which makes them less readable.

Note that most manufacturers (followed by some reviewers) quote numbers which are multiplied by three (counting separately red, green, and blue dots on the LCD screen). This is a questionable practice.

Field coverage: 100%

My measurements show about 99% at any zoom setting, which seems to be consistent with the claim.

Brightness adjustment: Yes, from the menu.

I have never used this on any digital camera. The daylight readability of the monitor is good anyway.

Tilt & swivel: none.

None expected in this class and size of the camera.

Index

Shutter

Type: Mechanical.

Cheaper cameras do not actually have a shutter mechanism; instead of that, exposure time adjustment is achieved by timing the information gathered from the CCD. Generally, mechanical shutter allows for higher image quality but costs more.

Speed range:

  • Manual: 8s-1/1000s
  • Shutter and aperture priority: 4s-1/1000s
  • Program: 1s-1/1000s
  • Adjustable in 1/3 EV steps

A serious range. Speeds higher than 1/1000s are more of a marketing than real-life advantage, while ones slower than 1 or 2 seconds require improvements in light metering and autofocus.

Shutter sound: Yes.

This provides a reassuring feedback to your picture-taking, not just a novelty effect. The sound can be set to a click (which I prefer) or to a beep; each in two levels of loudness; it can also be disabled if needed.

Index

Drive modes

Modes: Single-frame, sequential, AF sequential, autobracketing.

In the single-frame mode a picture is taken every time you press the shutter button. In sequential modes, the camera keeps shooting as long as the button is held pressed (or the memory buffer gets full). Autobracketing is discussed in the Exposure Control section.

The sequential modes are available only if images are stored in the JPEG format. In the first one the camera autofocuses the first frame only, shooting the next frames at the same setting; you can squeeze them one second (or less) apart. In the second (AF) sequential mode autofocusing is done for every frame, therefore the speed will be somewhat (30% or so) lower. The number of sequential frames is limited by buffer capacity, and it depends on the size of compressed files (therefore varying from subject to subject): you may expect at least three frames in the SHQ JPEG format, usually more in the HQ setting.

Actually, I do not pay much attention to sequential modes in this type of cameras; this feature becomes really useful only when the frame rate is two per second or higher.

Time-lapse: No.

This feature would be easy to implement in software alone, and, although not a real necessity, it would be more useful than the "movie" mode, or the "two-in-one" gimmick. There seems to be a silent agreement between manufacturers not to include it in compact cameras, as if these were of no interest to serious users. Wrong.

Index

Exposure measurement

Type: TTL (through the lens), using the CCD.

This is normal in compact cameras.

Modes:

  • Matrix ("ESP")
  • Spot

The ESP mode works OK under most of the shooting circumstances: the camera measures the light in a number of areas, and then decides what exposure would be best to accommodate the detected brightness range.

Spot metering is useful in hands of a qualified user when the main subject is significantly brighter or darker than its surroundings. It becomes more useful when combined with exposure compensation, and, I'm happy to report, the latter is implemented in the C-60 better than in any other small camera I've tried.

Switching to spot metering is done without going to the menu system — just by pressing the spot/macro button, which toggles through all four combinations of these two settings.

Note: Olympus refers to center-weighted (not ESP matrix) mode in their literature, but this is an admitted documentation error.

The metering system seems to work just fine, and it seems that under many circumstances (except from high-contrast scenes) it may not need my usual -1/3 EV compensation.

Brightness histogram: Yes, before and after exposure.

The histogram display is very useful in hands of a photographer who knows how to use it. Including it in this camera is a sign of quality.

Before the picture is taken, the live histogram can be overlaid on the monitored image together with the basic exposure information, and you can easily see if any image parts are exceeding the dynamic range. To correct the exposure, the left- and right-arrow buttons are used, which makes the process easy and intuitive.

Some inconvenience is caused by the fact that the histogram is either permanently on or off, switched from the menu system. There is no way to enable or disable it quickly. When active, however, it will be hidden while the shutter release button is half-pressed.

The histogram can also be displayed while a picture is being reviewed. To turn it on or off, two button presses are needed, not bad.

Index

Exposure control

Modes: Full auto, program, aperture priority, shutter priority, metered manual, six scene-specialized programs, one user-defined mode.

Everything a serious user would need.

  • The "full auto" mode is basically the same as the program mode, except that all (or nearly all) camera settings are returned to default: you will not be able to override the CCD sensitivity (ISO) setting, color balance, exposure compensation and most others. As a matter of fact, the menu access is disabled at all. The only functions that can be adjusted are flash modes, macro, and metering mode. Additionally, the LCD monitor stays always on in this mode; there is no way to turn it off.

    While the full auto is quite useful as a last-resort "panic button", I have some reservations here. On one hand, some critical functions are still not disabled (for example, spot metering). On the other, I see no reason to keep the LCD display always on; this is one thing about which even a beginner will never be confused, and the LCD uses a considerable amount of power.

  • The standard program mode is what I consider most useful in general, no-hassle shooting for most users. The camera chooses both aperture and shutter speed according to a factory-predefined "program curve". Still, the user can override most of other settings; most notably exposure compensation, image size/compression, color balance and ISO.
  • The shutter- and aperture-priority modes, where the user controls one of these parameters and the camera adjusts the other to provide proper exposure, are very useful in hands of at least moderately advanced photographers. Those who do not understand how shutter and aperture selections affect the pictures should stay away, using one of the predefined "scene modes" instead.
  • Six pre-defined "scene modes", i.e., prepackaged programs and camera settings: night, landscape, portrait/landscape, portrait, self-portrait, sports. In addition to modifying the program curve (i.e., the aperture/shutter speed choice), some of these modes may adjust the color response or other parameters. While this is not quite a replacement for intelligent use of shutter or aperture priority, it may come handy for users incapable or unwilling to learn these basics.

    The way in which the "scene modes" are selected is somewhat inconsistent. While the portrait and night modes have their own positions on the main settings dial, all others require turning the dial to the "Scene" notch, and then selecting one of the (four) remaining modes from the menu. This breaks the otherwise logical pattern.

    While I can understand the underlying reasons (lack of space), I would still prefer placing all modes on the dial itself. This could be done by making the dial just 1 mm or so bigger (therefore gaining 3 mm of real estate), and getting rid of the almost-useless self-portrait mode. As the "Scene" dial position would no longer be needed, the dial could easily accommodate the two extra settings.

Exposure compensation: Up to ±2 EV stops in 1/3 stop increments.

The camera's autoexposure system does not know how dark the objects in your pictures actually are (i.e., are they black, gray, or white). It will try do depict the image area as the standard, 18% gray regardless of whether you are shooting a beach or a granite rock. But this is not right: the beach should be imaged bright, and the rock, dark; showing them both at 18% will not result in good pictures.

In such situations, adjusting the exposure for the intended brightness improves the results considerably. Of all features of an automated camera this may be the most important one (adjusting the image in postprocessing is not the same).

In most small cameras which offer exposure compensation, this is done via the menu system, and it makes the feature virtually useless. And here is where the C-60 shines: to adjust the exposure, you just need to press the left- or right-arrow button.

Actually, the ease of exposure compensation was one of the decisive factors in our choice of the C-60 over its competitors.

Exposure lock: Yes.

Pressing the shutter release halfway locks both the exposure and focus; this is a common solution.

There is no separate exposure lock button (often present in more advanced cameras), but most users, including myself, will not miss this feature.

Exposure bracketing: Three frames.

The camera will automatically take three frames, varying the exposure from one to another in equal steps. When the images are on your computer, they can be reviewed and the best one chosen.

The shots can be spaced 0.3, 0.7 or 1 EV apart (1 EV corresponds to doubling or halving the amount of light reaching the sensor).

Autobracketing is not available when the pictures are stored in the TIFF format.

ISO settings: Auto, 64, 100, 200, 400.

Higher ISO settings allow you to use greater shutter speeds and/or smaller apertures (greater F-numbers) at given light conditions. This is achieved at the expense of increasing image noise and not only.

In the "auto" setting the camera stays at low ISO when there is enough light; at lower light levels, as exposure times increase, the sensitivity is boosted up to avoid camera shake.

Earlier digital cameras used to stay at the lowest ISO setting until the scene was really dark, even below handholdable shutter speeds. To the contrary, the C-60 raises the sensitivity quite aggressively. If you disagree with camera's decisions, you may set the ISO speed by hand in all modes except "full auto".

I found one omission here (shared with all other cameras I've tried): the exposure information shown in the LCD monitor does not indicate what ISO value is being selected by the camera in the "auto ISO" setting; you can see it only after the picture has been taken. This is not right: the ISO information is as important as the shutter/aperture combination (which is being displayed). I wonder why none of the camera manufacturers has thought about it.

White balance: Auto and four presets.

The four presets are: sunny, cloudy, incandescent, and fluorescent light. While most users will stay at the auto setting, the preset balances may often provide better results.

Unfortunately, the choice offered in C-60 is rather restrictive. For example, the Olympus 5060 offers three very different fluorescent presets, just one of which gives excellent results in my kitchen, much better than the auto setting, while another one works better with the light tubes used in my office.

I am also disappointed with the absence of the "reference" white setting, where you point the camera at a given area which you want to be shown as color-neutral (white or gray), and make this setting memorized. In some Olympus cameras (like the C-5050Z and C-5050WZ) this method brings excellent results. As this is done entirely in the firmware, it would cost nothing to include this feature in the C-60; it would greatly enhance the camera's capabilities.

Having said all that, I still consider the Olympus auto white balance well implemented, and delivering perhaps most pleasing results in the industry, and the C-60 is no exception here.

Index

Focusing

Autofocus: Dual system: passive (TTL) contrast-detection, and active, phase-detection.

Passive TTL systems use the image created by the lens to set the focus, the same way like in most modern AF SLRs. This is more accurate than active systems found on many point-and-shoot cameras, using an external AF sensor.

As I understand, in the C-60 the active AF is used for initial, rough setting, while the passive (TTL) one — for the final, more accurate adjustment. This should result in faster autofocusing, although it would be difficult to see how much actual difference does the dual solution make.

Dual system or not, I find the C-60 autofocus system somewhat about average for this kind of camera. Still, I would like to see multiple AF sensors (in addition to the center one), as this could save quite a few badly-focused snapshots.

Manual focus: No.

I can live without this feature, although a switch setting the focus to infinity (or, even better, the hyperfocal distance) would be very useful.

Autofocus modes: Single or continuous.

In the continuous setting, the camera keeps focusing all the time, regardless of whether the shutter release is half-pressed or not. This cuts down the shutter lag time (approximately by half) at the expense of greater battery drain. Still, I haven't used this feature except for trying it out.

Focus range:

  • From 50 cm to infinity in "regular" focusing mode;
  • From 20 cm (wide) or 30 cm (tele) to 50 cm in "macro" mode;
  • From 4 cm to 24 cm in "super macro" mode

While switching between "regular" and "macro" modes is done quickly by pressing an external button, to switch into "super macro" you have to go into the system menu, a process requiring ten or more button presses. This is cumbersome and inconsistent, possibly a result of assigning the macro and spot features to the same button.

When set to "super macro", the camera zooms out to the widest lens angle. This is why the resulting field of view is slightly wider than in other Olympus models I've used (about 44 mm across). In those, the focal length is set to an intermediate value (C-5050Z, C-5060WZ), or to the long end (D-580).

The quality of "super macro" shots is good. Of course, using a tripod will help, not just to avoid camera shake, but also to assure precise autofocus, especially important in view of the very shallow depth of field at these distances. There is a slight vignetting (corner darkening), but it is barely noticeable. Overall, a strong performance.

The need to switch between "regular" and "macro" modes at the distance of 50 cm (about 20 inches) may be an annoyance when shooting near to that limit, in spite of some overlap between both distance regions. I suspect the design was intended to speed up the autofocusing in each of these two regions. You win some, you lose some.

Autofocus steps: Unknown.

This is unpublished, but with the great depth of field exhibited by small-sensor cameras this number is no longer of much importance.

Focus confirmation: Green LED and monitor.

A steady green LED light next to the viewfinder (and a green dot in the corner of the LCD screen) denotes right focus; blinking means that the focus could not be achieved.

Most autofocus systems can be fooled, though, and this one is no exception. Sometimes (especially in the super macro mode) I would have a focus confirmation for a picture hopelessly out of focus.

Index

Flash

Built-in flash range: 3.4 m (EFL=38 mm), 2.0 m (EFL = 114 mm)

These numbers are quoted after the Reference Manual which is not clear about the ISO values at which they are valid (I would guess ISO 100). The real-life performance seems to be somewhat better (larger range); the camera is quite aggressive in raising the CCD gain (ISO) for larger distances.

Guide No.: Unspecified.

My estimate (at ISO 100) would be about 10 m (33 ft), respectable for a small camera.

Recharging time: Below 6 s.

This time is shorter when shooting from less-than-maximum distance (the flash uses less energy then).

Metering: TTL (through-the-lens).

Images are properly exposed in the whole distance range from 20 cm up, although you may have to use flash exposure compensations in tricky situations.

Flash compensation: ±2 EV.

Very useful, especially when the flash is used as a fill-in outdoors.

When the flash is used as the main source of light, this value adds to the overall exposure compensation value.

Usage modes:

Auto, red-eye, off, forced on, slow synch (front and rear).

Slow synch allows to add flash to long exposures.

In such cases you can have the flash go off at the beginning, or at the end of the exposure. For stationary objects this does not make any difference, but for moving ones it does, as the "streaks" will precede or follow the sharper, flash-generated image, respectively. (The second option is referred to as "rear-curtain synch" in the SLR world, and is available only in better cameras.)

Provision for external flash: None.

Don't expect this in a subcompact camera.

Slave-compatible: No.

A slave flash is triggered remotely by the light from the built-in one. The latter, however, emits a so-called pre-flash for metering purposes — this means that the slave will be triggered before it is actually needed. This is common, although some models allow you to disable the pre-flash. Not the C-60.

Some slave units will ignore the pre-flash; if you are desperate, get one of these.

Index

Image sensor

Type: CCD (charge-coupled device).

This is what almost everyone else uses.

Pixel count: 6.30 million gross, 6.07 million effective (according to Olympus).

The gross count includes pixels near the edges of the CCD, which are not used in building the actual image (they may be used for other purposes, like white balance setting).

The claimed effective pixel count of 6.07 million does not seem to be true: the native image size is 2816×2112, and this results in 5.95 million pixels. In terms of traditional, binary (as opposed to decimal) megapixels, the count is 5.67 MP.

Still, this is plenty, more than the C-60 actually needs.

Size: 1/1.76 in.

This traditional specification doesn't mean much. In particular, this is not the diagonal of the image frame. Note that some similar models use smaller, 1/2.5-inch sensors (and bigger is better here because of noise and color spillage).

Image size: 5.3x7.1 mm.

These are my calculations. Assuming that Olympus defines focal length equivalence in terms of the frame diagonal, that diagonal is 8.9 mm (computed as 23.4/114*sqrt(242+362)), and from this, using the Pythagorean theorem, we get these dimensions. (I'm sure these numbers are good within 2% or better).2

Index

Image resolution and storage

File formats: TIFF, JPEG.

Olympus chose not to include an option to save images as raw (ORF) files. While this would be a nice thing to have, most users will not be missing it. From my past experience, I resorted to the raw format only very occasionally, with the JPEG format sufficient for anything I'm doing.

JPEG compression: 1:4 (SHQ) or 1:11 (HQ).

These are nominal, approximate numbers, as the actual JPEG compression rate varies from image to image. More exactly, the camera expects an average SHQ image to be 4.34 MB in size (compression ratio 4.2), and HQ — 1.46 MB (compression 12.3).

While the SHQ (1:4) compression is good enough for almost any application, I would prefer to have a 1:2 option for critical uses, undistinguishable in quality from an uncompressed TIFF, while still squeezing twice as many images on the memory card.

Actually, I find the HQ (1:11) compression good enough for many, perhaps most, uses.

Pixel size:

  • 2816×2112 (5.7 MP)
  • 2560×1920 (4.7 MP)
  • 2272×1704 (3.7 MP)
  • 2048×1536 (3.0 MP)
  • 1600×1200 (1.8 MP)
  • 1280×960 (1.2 MP)
  • 1024×768 (XGA)
  • 640×480 (VGA)

This is a wide choice. All formats have the "digital" 4:3 aspect ratio; there is no provision for the 3:2 one, but images can be always cropped in postprocessing if so desired.

Note that my megapixel (MP) count uses the traditional, binary meaning of mega, meaning 1020 or 1,048,576, and not the one used in sciences, i.e., 1,000,000. In my count, one megapixel of an 8-bit, uncompressed RGB image takes exactly three megabytes.

Usually I'm against saving images in less than native resolution; resampling can always be done in postprocessing. With the C-60, however, my wife and I decided that the native resolution of 6MP is more than she needs for any purposes, so we have set the image size to 3.7 MP. I believe this relates better to the lens resolution, while allowing to store 54% more images on a memory card.

Recording modes: Each pixel size in either compression, plus uncompressed TIFF.

This is quite logical. The image size/quality menu allows you to choose from TIFF, SHQ (native-size, low-compression), HQ (native-size, high compression), SQ1 (4.7 MP down to 1.8 MP, either compression), and SQ2 (1.2 MP and below, either compression. You may set the SQ1 and SQ2 positions on the menu to your liking, and then switch just between the four high-level JPEG presets (plus TIFF).

Image adjustment: Sharpness and contrast, each separately in ±2 steps.

The raw image from the sensor is processed, before being stored, with use of a contour-enhancing and/or contrast-adjusting algorithms. An advanced photographer would usually prefer to keep these enhancements at minimum, preferring to do the adjustments when the image is postprocessed on a computer.

In the C-60 I would, however, suggest keeping the sharpness at -2, even if you are not planning to postprocess your images: the factory-default sharpening is excessive, and you do not need a keen eye to see the resulting artifacts (white lining) at high-contrast boundaries.

This is quite strange; something I would rather expect from a cheapo, mass-market model, which the C-60 is not. I believe the default setting should be at the present -2 level, with ±2 steps of adjustment left for those who want to tweak it.

My advice: right out of the box, set the sharpness to -2 and forget about it.

Noise reduction: Yes.

This feature, accessible from the LCD menu (and activated by default in the "night mode"), supposedly reduces the "fixed noise", occurring at longer exposures (1/2 second or more), especially at higher ISO settings.

Not taking anything for granted, I did a simple test of this feature, with most surprising results. While NR removed two hot pixels from a picture taken at ISO 200 and a 1.3 s exposure, it also added some noise at medium-to-deep shadows. The samples were taken under controlled, identical conditions, so I stand by these results.

Just to be sure, I also took two night pictures of my Halloween pumpkin outside the house at ISO 400 and 4 s exposure time. This time, there were more hot pixels in the non-NR image, and noise reduction removed them all, at the same time introducing an amazing amount of extra noise and ruining the tonal balance to the point of making the image unusable.

This, I believe, makes the noise reduction function in the C-60 useless, and my advice is just to ignore it. The camera has a very nice performance in low light anyway (my 200 ISO images are quite pleasing), and, frankly, how often will a user of a clamshell camera carry a tripod around to take pictures at four-second exposures?

It would be, however, more honest of Olympus just to remove this "feature" entirely and not to make any claims about it.

Storage media: xD-Picture cards.

This format was introduced by Olympus and Fuji to replace the SmartMedia, and is not used by any other camera brand. The cards are very tiny and quite robust; as of the early 2005, they are available in capacities up to 512 MB, with higher ones promised.

A 32MB xD card is included in the package, just to get you started. A larger capacity, at least 256 MB, is essential for any real-life use.

Note of August, 2006: In the last year or two, Olympus added to the confusion by introducing two new flavors of xD-Picture cards: "M" and "H" (the latter claimed to have a higher writing speed). These cards come, as of this writing, in capacities up to 1 GB. Unfortunately, they do not work with the C-60 (and no firmware upgrade to address the problem is available).

It also seems that Olympus has abandoned the older, "regular" flavor. Before buying any xD-Picture card, make sure that it is not of one of these new types. The largest card I've tried on the C-60 is a 512 MB one made by Fuji, and purchased in 2005.

Note of November, 2009: To see why I dislike so much the xD-Picture card standard, refer to my xD Card Abomination article. As of now, it looks like Olympus is (five years too late!) abandoning this format, and switching to Secure Digital.

Power source

Batteries: LI-12B lithium-ion (proprietary, included).

Many of us have doubts about proprietary, expensive batteries incompatible with any others, but these are hard to avoid in subcompact cameras. This small, brick-shaped unit packs 1200 mAh of charge; at the nominal voltage of 3.7 V this translates into 4.4 Wh of energy stored. (As a reminder, compare the watt-hours, Wh, not ampere-hours, to judge battery performance!)

For comparison, a pair of 2000 mAh NiMH, AA-type batteries at 2.4 V stores (nominally, at least) 4.8 Wh of energy. While this is slightly more, NiMH batteries suffer from output voltage drop while being discharged, so at some level most cameras will stop working, being unable to utilize the whole stored energy.

The older compact-sized Li-Ion from Olympus, Li-10B (distributed, for example, with the C-50), can also be used with the C-60, but it has slightly lower charge of 1000 mAh. If you can get one cheaply, you may use it as a spare.

Getting an extra battery (in addition to one included in the package) is in any case a must. Sooner or later you will run out of juice in a middle of a shooting opportunity, and the camera will not work with anything easily available (a great advantage of models using the standard AA size).

The Olympus battery is not cheap: $40 or so, with third-party replacement about 25% less. Beware that some vendors may sell both the Li-10B and LI-12B as the same product (and at the same price).

Li-Ion batteries have an advantage of low self-discharge rate (loss of energy when not used). In the first day or two a NiMH loses about 10% of energy, more than a Li-Ion battery loses in a month.

This is what my wife likes about the Li-12B: she can keep the camera (or a spare battery) for a month or more unused, and still ready for action.

Charger: Included, model LI-10C.

This charger accepts from 100 to 240 V on input, handy when in travel. It recharges a Li-12B battery in about two hours, quite fast. Without foldable prongs, it uses a power cable to connect it to an outlet.

Battery life: No specifications.

While I have not performed any tests or trials, battery life in the C-60 seems to be better than average for recent subcompact models. During our vacation in California my wife used the camera all the time (without flash, but with heavy use of the LCD monitor), switching batteries only at night. Only once in ten days did she run out of power and had to use a spare.

Reviews at Imaging Resource often contain measurements on battery drain. Using the data available from that source I was able to compute power consumption of the C-60:

  • Camera ready, LCD monitor off: 1.3 W
  • Camera ready, LCD monitor on: 1.9 W

For the previous, similar Olympus model, the C-50, the usage was 0.5 W and 1.8 W. Note the increase in the power use without LCD, hard to explain with the higher pixel count of the CCD; this also suggests that the power use by the LCD itself has decreased.

An interesting byline: for the larger C-5060WZ the numbers are 0.1 W and 3.1 W; note the amazingly low power consumption with the LCD off! Why does the subcompact use more than ten times the power of the larger camera?

External power supply: Optional, D-7AC.

I haven't seen or used this model, and I haven't seen any dealer having it in stock (including the Olympus' own online store).

Index

Controls and ports

Camera top: Shutter release, zoom lever, mode dial, power-on LED indicator.

The mode dial feels and operates just right. It provides settings for full auto, program, shutter and aperture priority, manual, user mode, movie mode, portrait and night programs. Another position provides menu-based access to other specialized program modes.

Having to go to the menu system to switch into some programs while others are accessible directly from the dial is not an elegant solution — see the Exposure Control section above.

The user mode setting (moronically named "My Mode") is very useful. We decided to assign it to the "super macro" mode with aperture priority exposure automation. This allows my wife to switch into macro without going through the menu system, what a relief!

The zoom lever has a very short throw, and at least one reviewer complains about that; I don't find it objectionable.

Back: Flash mode and macro/spot buttons, image review button, four arrow cursor buttons with an OK button in the center; LCD monitor, viewfinder eyepiece, and the busy light.

The camera back is quite streamlined; the arrangement is logical and easy to use. My wife, who is not fond of technological gadgets and multiple controls, got used to it in no time.

Turning the monitor on or off requires two button presses (OK and down). While I would rather prefer a separate button for this function, the solution turned out to be less cumbersome than I was afraid it would be.

The four arrow buttons control (hallelujah!) the most important aspect of picture-taking: exposure adjustment. Left and right arrows adjust exposure compensation (program, aperture- and shutter-priority modes), the up and down ones control shutter or aperture (shutter- or aperture-priority, respectively). This is a brilliantly simple and logical design.

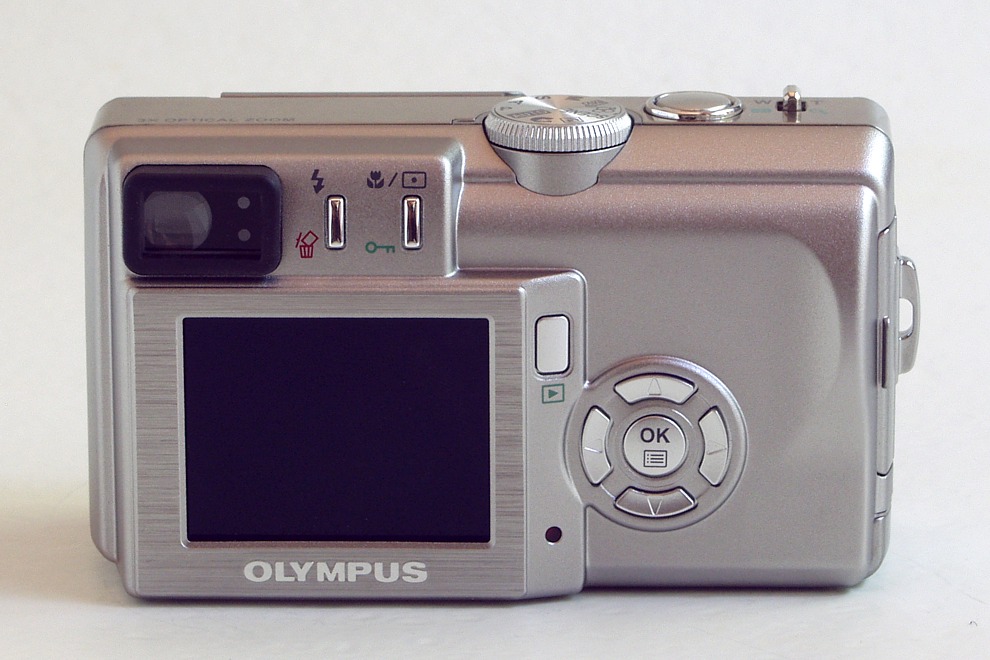
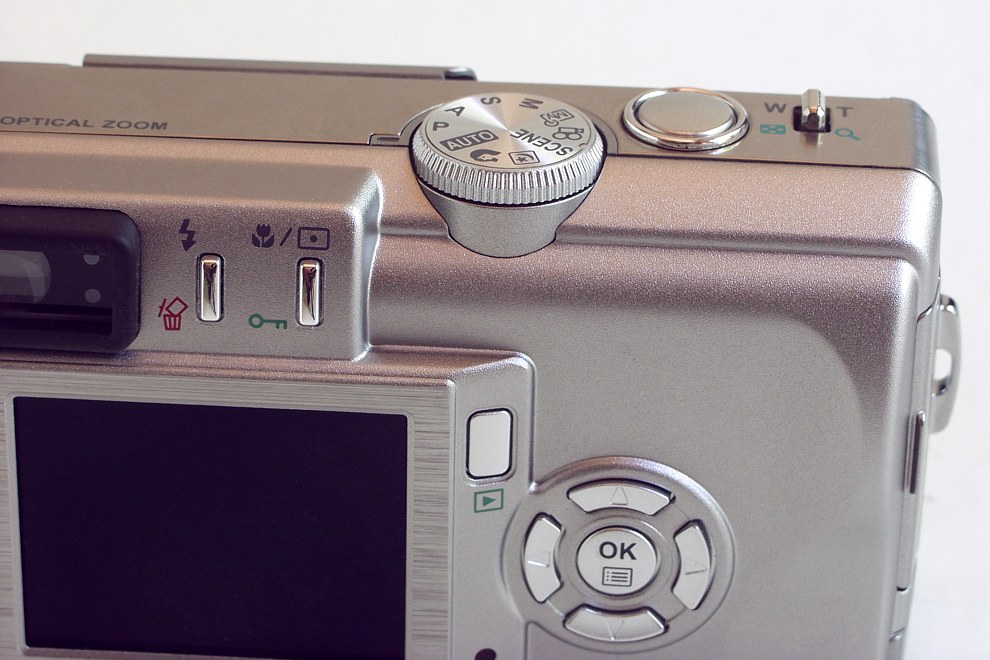
Here you can see all of the camera's controls, easily accessible and neatly arranged. The most important adjustments (exposure compensation, shutter speed, aperture) are accessible without the menu via the arrow keys, as described above.

I find this arrangement better than in any other subcompact camera I've tried (assuming that they allow for these adjustments). Actually, this was one of the main reasons we decided upon the C-60 over competition.

Even if the LCD monitor is off, it will turn on momentarily when any adjustments are made, so that you do not have to make them blindly.

The rubber eyepiece protector also houses two LEDs, signaling autofocus status and need for flash.

Left side: Speaker.

Right side: Power-in terminal, audio/video output, USB connection.

These three are hidden behind a hinged door.

Menu system: Accessible from recording or viewing mode (different options in each case).

The menu system is quite good, similar to that in other recent Olympus models (including the C-50x0 and D-5x0 series).

It opens with four items assigned to the arrow buttons. Of these two are hardwired (monitor on/off and full many access), and two others can be assigned by the user as shortcuts to almost any settings. After some deliberations, I have assigned the shortcuts to image size/quality and histogram on/off, but your preferences may differ.

Index

Other features

Settings at power-up: Factory presets or last used.

This is OK, but I would like to have a third option: my own power-on defaults (the "My Mode" setting serves a similar purpose, but not quite).

Self-timer: Electronic, 12 s delay.

This is OK. In many situations using the remote may be easier.

Remote control: Included infrared; 2-second delay.

This is a new RM-2 remote from Olympus. It gets rid of all controls except of the shutter release button, and I am not missing the options taken away.

The two-second delay is just enough to get the remote out of sight if you are in the picture.

The remote infrared receiver is placed on the front of the camera. This greatly limits its usability; as the '5060 does not have a wired or radio-remote option, I like using the infrared one when shooting from a tripod, to avoid camera shake.

Many users will use this remote to trigger a tripod-mounted camera in close-up or wildlife applications. This is where the two-second delay is quite painful. Providing an option to turn the delay off would be a great improvement. (The front placement of the on-camera sensor also is a hindrance in such applications; dual sensors would be best.)

Note: I doubt if the remote is included with cameras sold on European markets. In many previous Olympus cameras it wasn't.

Voice annotation: Up to 4 seconds with every picture; recording and playback.

I don't think many users will find this really useful.

Digital zoom: Continuous, up to 4x, accessible at the longest lens setting.

This feature stretches the central part of the picture so that it fills the full frame. This, however, is done by resampling an image up from a smaller number of pixels: for example, a 4x "digital zoom" (quotes intentional!) gives you an image quality comparable to that of a 0.375-megapixel camera (6MP divided by 4 squared). As such, the feature is good only for maker's advertising, nothing else.

When the "digital zoom" is enabled, it is easy to activate it by mistake just by zooming in. I would recommend disabling this feature and forgetting about it.

External interfaces: USB, TV audio/video.

The C-60 still uses the older, slower USB 1.1 — strange, as the USB 2.0 standard has been common in new computers for almost three years.

With Windows 2000, ME, or XP (or Mac OS 9.0 or later), your camera will be recognized as an external drive, so you may copy files easily to your hard disk.

The TV output can be switched between NTSC and PAL. It can be also used for real-time scene preview.

User interface language: Selectable.

There is a choice between a number of languages; this, I suspect, depends on the particular market.

Printing support: DPOF, PictBridge.

Image files may have information for DPOF-compatible photofinishers embedded: number of prints from a given frame and cropping area. I've never met anyone who uses this.

PictBridge support means that images can be printed directly from the camera (without use of a computer) on printers supporting this feature. Again, advanced users usually move their files to a computer first, so that PictBridge support will not be essential for that group.

Movie mode: Quick Time Motion JPEG format with sound at 15 frames/s: 320x240 or 160x120 pixels.

This is not more than just a toy feature. Don't expect any usable results from this image quality.

Panorama mode:

Yes, but only with Olympus-brand xD cards.

This is enabled only if the camera recognizes an Olympus-brand xD card. There are no underlying technical reasons for this limitation (just the corporate greed). In this mode the camera measures the exposure at the first frame and keeps the settings until the whole sequence is done. This can be done equally well by switching to metered manual exposure.

In any case, I consider limiting any feature to branded memory cards as a very questionable decision. We can vote with our feet, by trying to avoid Olympus-brand memory cards.

Responsiveness: Better than average.

I haven't measure the power-up and shot-to-shot delays, but the camera feels quite responsive, among the faster ones I've tried so far.

Index

Documentation and software

Documentation: Quick Start poster, Basic Manual (printed), Reference Manual (on CD).

The Quick Start poster will allow a beginner, possibly somewhat intimidated with all the options the camera provides, to get started quickly.

The printed Basic Manual, a 4x6" booklet in four languages, does not contain any information a semi-intelligent user wouldn't figure out by just playing with the camera.

The Reference Manual is included only on the CD (a separate PDF file for every language). As is usually the case with Olympus documentation, it is neither fish or fowl: a tyro snapshooter usually wouldn't bother looking, while an experienced user will find the depth of coverage disappointing, and sometimes even insulting.

Included software: Camedia Master 4.3.

While every new release sees some improvements, I still don't like this program, period.

Image quality

The image quality is among the best among subcompact cameras (although that of the Canon S-series is clearly better here).

Here is a separate page with some image samples from the C-60, so that you can judge for yourself. A very informative set is also available on Steve's Digicams.

I am getting an impression, however, that the lens does not really seem to make a full use of the six-megapixel image format. Worse, the camera tends to grossly oversharpen the images before saving them to the card. This may look good on a 4x6" (10x15cm), but not really on a larger print.

This is most visible on a contrasty horizon line: oversharpening often gives it a narrow but well-visible white halo on the sky side, a really cheap look. (True, most other subcompacts I've tried also suffered from this effect, and usually to a larger extent.)

My recommendation is to set the in-camera sharpening to minimum (i.e., -2), and even this seems to be barely enough. Actually, this is my main complaint about this camera.

Index

The competition

The competition in this class, although quite crowded, is not very strong: most of subcompact models are aimed at beginning amateurs who are not really concerned about the degree of control over the imaging process or (beyond a certain minimum) about image quality.

I have had a close look at various competing models from a number of makers, including Canon, Nikon, Fuji, Casio, Epson, Kodak, and some others, and also at some other subcompact models by Olympus. This was a quite big task, and it led to quite disappointing results.

There was one exception (in three minor variations): the Canon S-series (S-50, S-60, and S-70, all very similar to each other; my opinion on the S-70 is based on its general similarity to the S-60). These Canon cameras clearly beat the Olympus C-60 (and all others I've checked) in terms of lens specifications (wide angle starting at 28 mm EFL), sharpness, and general image quality. My choice of the Olympus over Canon was due to smaller size and better controls. While the latter can be subjective, the C-60's advantage of direct (no menu!) access to exposure compensation is a major factor.

Another Olympus offering in this category, the Digital Stylus 410, offers a more reasonable pixel count of 4MP (which I consider to be an advantage in this category!), but I judged it far behind the C-60 in terms of both image quality and controls.

Index

The bottom line

The Olympus C-60 is like two cameras in one: it can be uses as a no-brainer snapshot camera, while for a more advanced user it also offers a high degree of control. Most importantly, it provides a simple, one-button access to exposure compensation, which may dramatically improve the quality of results.

The controls are logical, extensive, and generally good, so is the general look and feel. Build and finish also seem first-class. The camera is easily pocketable (or, for that matter, purse-able).

Image quality is more than satisfactory, with the traditionally excellent Olympus color and tonality, and acceptable sharpness (second-best in this class, see above), although a six-megapixel CCD seems to be a bit of overkill.

I can recommend the C-60 to two classes of users:

  • Ambitious beginners, who expect to learn "on the go" and develop more need for the advanced camera features and capabilities with time;
  • More experienced photographers, who need a pocket camera to carry along when they don't feel like taking their "real" gear along, but who still are unwilling to give up a degree of control and image quality.

My wife, the intended user of the camera, belongs to the first group. She grew used to it in just a few days, and, after grasping the concept of exposure compensation, she is getting some very pleasing, high-quality results.

Update of July, 2006: After two years my recommendation about this camera gets even stronger. The trend among major camera makers (including Olympus) is to make newer models cheaper, not better: that's what the mass market wants. The more recent models I've seen or tried, follow that pattern, and the market for quality compacts seems to be disappearing (or being ignored).

If you can find a second-hand C-60 in good shape, grab it. You will be glad you did. (Just make sure that you can find the right xD-Picture card for it, see my note above.)

Update of November, 2009: Read the above and do it! They don't make them like that any more...

Index

Web resources

  • The C-60 review at Steve's Digicams. Maybe not very technical, but contains detailed description of the controls and meaningful image samples.
  • Imaging Resource has a very good review of the C-60. In particular, they show data on the image resolution, which seems to be somewhat better than my qualitative impressions would suggest.

Other than these reviews, I wasn't able to find anything informative on the C-60.

Index

See also: my C-60 image samples.


This page is not sponsored or endorsed by Olympus (or anyone else)
and presents solely the views of the author.

Home: wrotniak.net | Search this site | Change font size

Photo News | The Gallery


Posted 2004/11/07; last updated 2014/01/25 Copyright © 2004-2014 by J. Andrzej Wrotniak