|
Olympus E-510 A Technical Review and Reference |
|
|
My other articles related to the |
|
This is a detailed, technically-inclined review of (and refeence for) the Olympus E-510 digital SLR. Originally based on the first three weeks of my familiarity with the camera, it was being expanded and refined for about a year. As of this (June, 2008) update, it is basically complete, although I can predict small, occasional touch-ups and additions in the months to come. This is a long article, as it contains explanations of the concepts used, clarifications of the specs, and quite a many, possibly opinionated, comments. Before reading it, you may want to have a look at Class of 2007 (a brief intro to the E-510 and E-410); after — check my E-510 Quick Notes.
|
|
Table of Contents |
All accompanying images, unless stated otherwise, were shot with the Olympus C-5060WZ in aperture priority, Some other E-510 articles here: | |
|
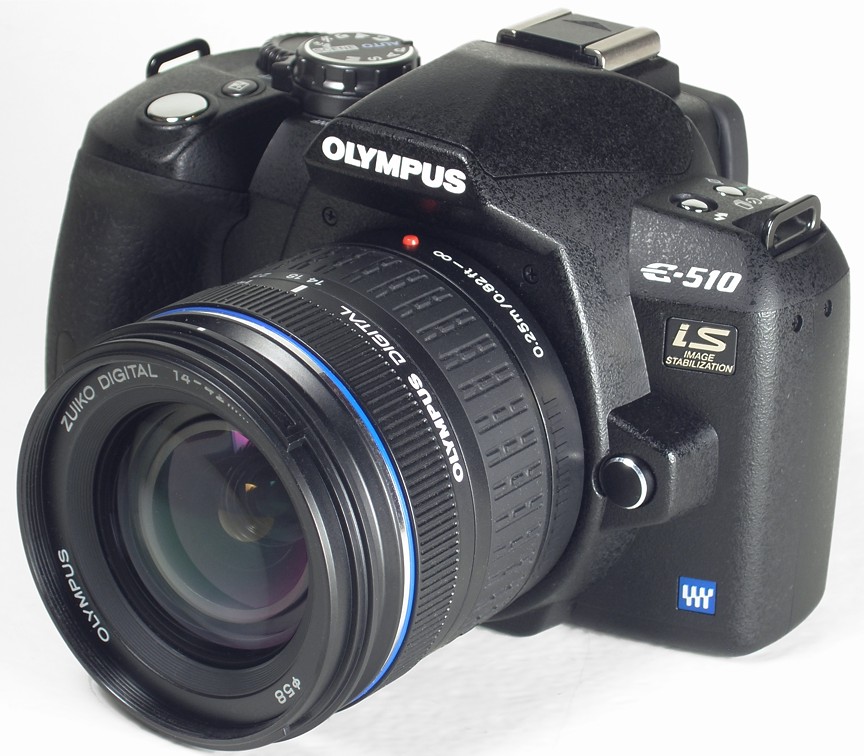
This is the seventh model in the Olympus E-System line of digital SLRs, based on the Four Thirds standard on the lens/camera interface. The series started with the professional E-1 back in 2003 (a camera which achieved a cult status, still having many dedicated users), followed by the E-300 in 2004, and then, in late 2005, by the popular E-500: inexpensive, but nicely made and capable of delivering first-class results. After the E-500, Olympus released two 2006 models (which were not intended to replace it, but rather to complement the line): the E-330, first live digital preview in an interchangeable-lens dSLR, and the E-400, a transitional model, never sold in the U.S. market. The E-500 became deservedly popular, and brought Olympus dSLR sales up by 40%, but on this market you have to get a "new, improved" model every year: how can a camera delivering good images in 2005 produce equally good ones in 2007? Enter the class of 2007: the non-identical twins, the E-410 and E-510, soon to be followed by the pro-grade model (not named yet). All these have one feature in common, almost new to the Olympus SLR line: live image preview on the LCD monitor. I said "almost", because of the E-330 mentioned above, but that one became, for a number of reasons, rather a niche product, being outsold many times by the E-500. And — lo and behold — this year Canon has introduced live preview in the EOS D1 Mark III ($4500, body only). The new cameras share most of the features and specifications, including the image sensor and the whole image-processing engine (both hardware and firmware) are more than evolutionary, incremental modifications to the E-500 (or E-400). The most important change is the transition from a coupled-charge device (CCD) image sensor used in the previous models to an NMOS one (referred to as Live MOS by the manufacturer). This change was necessitated by the live preview: it looks like CCD sensors are not able of supporting it. That's a pity, because the Kodak KAF line of sensors Olympus used before was excellent; the new NMOS ones have yet to prove themselves. NMOS stands for "negative-channel metal oxide semiconductor" and it is closely related to the more common CMOS (complementary metal oxide semiconductor) sensor type; thanks to Eamon Hickey for this clarification. The differences between the E-410 and E-510 are limited to just three things:
For more, again, refer to my Class of 2007 article. |
|
|
|
Most of these are as claimed by Olympus, if available; if not, other sources (including my own measurements or deductions) are shown; I will be clear if the latter are different than claimed. The official manufacturer's specs can be found here. | |
|
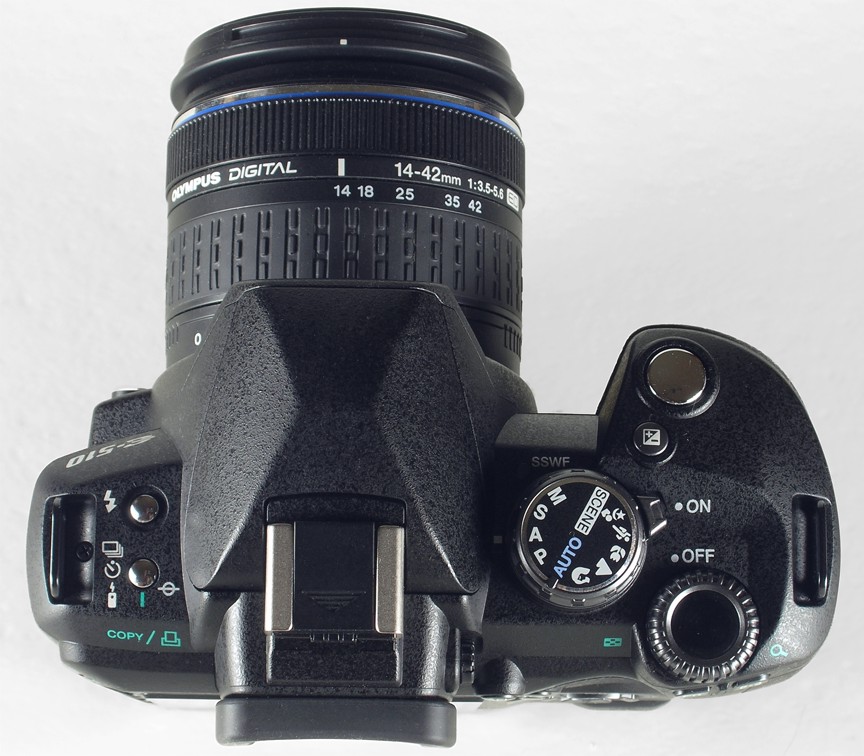
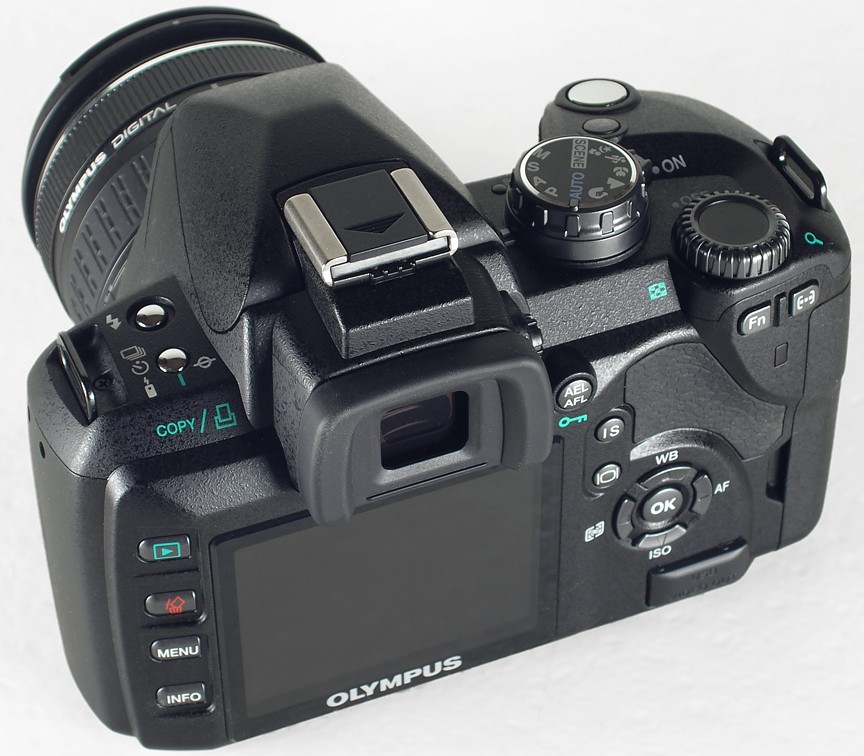
Construction:
Plastic (polycarbonate fiber?), metal inner frame. | Lightweight, but with a solid feel. Rigid enough: tight fit of parts and no flexing. |
|
Finish:
Crinkled black; rubberized grip and thumb rest. |
Somewhat improved from the E-500 (which has a smooth matte finish), but not as good as in the E-300 (where the crinkled surface could be taken for metal). Very nice job overall. |
|
Weatherproofing:
None | Not in this price range, and tough to do in this size/weight category. |
|
Size (WxHxD):
136×92×77 mm |
This is quite small, one of the most compact digital SLRs on the market, but the camera really looks smaller then the numbers would indicate. While you are handling the E-510, it seems significantly smaller than the E-500; putting them side by side (and using a ruler) defies this impression. Actually, this camera is 5.5 mm wider than its predecessor, it is also deeper — due to the thicker grip with a bulge in the lower part. Yes, the body height has been reduced by 2.5 mm, and the controls on the camera's back had to be squeezed a bit in the vertical dimension, but that's it.
Yet, somehow the designers added a sloping curve here, a differently profiled edge there, and achieved this overall effect of the camera being smaller than it really is. Overall, the older E-500 looks more chunky and, I dare say, cuter than the new model. Looks aside, I also like more the way in which the old camera sits in your hands (at least after the first two weeks of using the E-510). One more thing, already mentioned elsewhere: in the E-510, due to the prominent protrusion to the left of the viewfinder, the latter is more centrally located. This leaves most of us non-Japanese sticking our noses into the LCD monitor way too often. I think the older shape is more practical. On the plus side, the thumb rest, in addition to being now padded, is also better profiled, which makes accidental pressing of the Function button (Reference WB in the E-500) less likely. |
|
Weight (body):
460 g |
This, counted without a battery or memory cards, is fairly low, if a tad (25 g, or just about one ounce) more than the E-500. Still, the E-510 remains one of the lightest bodies among digital SLRs:
The BLM-1 battery will add an extra 75 g, and, if you have to know, a CF card — another 8-12 g, to the total of about 545 g. Fortunately, in spite of the low weight the camera feels solid; certainly more so than, for example, the Digital Rebel XTi, i.e., Canon 400D. For a comparison, here are weights of some competing models of the same vintage:
As we can see, the body-plus-battery weight of the E-510 is almost the same as of the similar Canon and Nikon models; the only camera standing out in this respect is the E-410. The size and weight advantages of the E-510 (not to mention its smaller sibling) become visible only when you add lenses into the equation. The battery weight and capacity will be discussed in the power section. |
|
Lens mount:
Four Thirds standard |
This is a standard, specifying the sensor size and lens mount, including the backfocus length (distance between the lens flange and image sensor), as well as the mechanical and electronic coupling to the camera. The standard is open, but so far only Olympus and Panasonic make cameras following it (with the sole Panasonic DMC-L1 model also re-branded as Leica Digilux 3).
At this moment Olympus has more lenses available, designed specifically for its digital SLRs, than other manufacturers for their respective APS-C systems. (Yes, those cameras will work with legacy, film-SLR lenses of the same brand or mount, but this is not quite the same, especially for the wide-to-normal optics at full apertures.) There are also two lenses branded by Leica (if you can afford them), and a number of ones by Sigma (of varying quality), which will be fully functional with any Four Thirds body. Because the Four Thirds frame is half of the (linear) size of a 35-mm film one, any lens used on such a body provides the same angular coverage as a lens with twice that focal length on a 35-mm film camera. What is often overlooked, is that while the four Thirds lenses do not have to provide an image circle covering a full 35-mm frame, within their coverage they have to assure twice the resolution, because the image undergoes twice the magnification between the sensor and the final viewed image (print or screen). The full list of Four Thirds lenses is available elsewhere on my site. The Olympus lenses range from inexpensive (still, very respectable), through mid-price (try to match the 50 mm F/2 Macro ZD performance at any price, not just $430!) to some pro-grade, exotically-priced glass (like the 300 mm F/2.8 ZD, at $6000 or so). The mount size (internal diameter) is 46 mm, is huge, especially when compared to the sensor size; actually, it is larger than in most 35-mm film SLRs. There are some good reasons for that, but this is beyond the scope of this article. Besides, other camera makers avoid talking on this subject. |
|
Control coupling:
Electronic |
There is no mechanical coupling between the camera body and lens (except, obviously, for the bayonet fixture to keep the lens attached); a focusing micromotor is built into every lens, and the aperture also responds to electric signals received from the body. Each lens has its own microprocessor, running its own firmware, which can be updated from the camera.
The zoom control is, like in all digital SLRs, mechanical, and this is much more precise than any electronic adjustment by controls on camera's body or by a "fly by wire" lens ring. I've seen gossip about the kit lenses using "fly by wire", electronically-coupled zooming in the new "kit" lenses. This is an example of some half-wit spreading irresponsible rumors; anyone can check that just by turning the zoom ring on a lens not connected to the camera. The latter solution is, however, used for manual focusing (at least in all ZD lenses I've seen). Usually I dislike this feature, preferring a mechanically-coupled focus ring, but, as you will see below, this can be done right, as demonstrated by the two new "kit" lenses. |
Bundled lenses:
Both lenses shown to scale (Photos by Olympus) |
Depending on the package, the camera can come with both these lenses, or just the first one, or with none. (I am not sure if the 17.5-45 mm, F/3.5-5.6 ZD is available on some markets). The lenses are priced very competitively, increasing the cost of the package by only $100 or so apiece, so that the 2-lens kit becomes an obvious choice, even if you already have a bag (drawer?) full of Zuiko Digital optics.
Both these lenses were originally introduced with the E-400, bot that camera was never available on the North American market, so they are actually just debuting in the U.S. They deserve a separate article, so here are just the first impressions. First of all, these lenses are incredibly small and lightweight:
To make the comparison more honest, we have to notice that the new "tele" zoom is not as bright as the old one; the difference is about 1/3 EV at the short end, and 2/3 EV at the long one (this corresponds to required shutter speeds longer by 26% and 60%, respectively, if the aperture values are accurate). Still, we are talking about 300 mm EFL (Equivalent Focal Length), providing the same image angle as a 300 mm lens on a full-frame 35-mm film camera! Compared to that, the 3 mm lost at the long end of the shorter lens are pocket change. What I consider most important here that Olympus kept the 14 mm (28 mm EFL) wide angle end in the new lens, not choosing the easy way to rise it to 30 or, blasphemy, 35 mm EFL (15 or 17.5 mm actual value). Both new lenses together weigh less than the older 40-150 mm alone (or, for that matter, the 14-54 mm F/2.8-3.5 ZD, my favorite "standard" zoom), and this makes them ideal companions for traveling light or hiking. Nothing, however, comes free. To trim the weight, Olympus engineers had to reduce the use of metal in these lenses, up to using plastic lens mounts. While something makes me to abhor this very idea, I understand the reasons behind it: attaching a metal bayonet to a totally plastic construction would only move the point of mechanical vulnerability from the bayonet itself to the screws securing it to the rest of the lens. Anyway, only time will tell how does the plastic mount affect long-term reliability and precision of these lenses. To be impartial: almost all other manufacturers (except for Pentax) have been using plastic mounts in their "kit" lenses for a few years already; Olympus was, as far as I know, the next-to-last Mohican. The letters "ED" in lens designation stand for using special glass in the lens design (low dispersion, extra-low dispersion, or high refraction, which achieves the same goal). This allows for better correction of various optical flaws, especially important under the size and weigh restraints Olympus designers imposed upon themselves. The downside is that the solution costs extra money, as do aspherical elements, introduced for the same purpose. The 14-42 mm ZD ED has two aspherical elements and one made of ED glass; quite unusual in a "kit" lens; the 40-150 mm ZD ED sports one ED element. To me, it shows Olympus is serious about image quality in these lenses, there is no "they won't need that" attitude. We also do not know what, if any, is the use of molded synthetics in lens elements. This may affect, in the long run again, optical quality. If any of the Readers has any information of that, please let me know. Now the good news. So far both lenses seem to perform very nicely, better than I ever expected and visibly better than the "old" kit lenses. (Since the original posting of this review I was able to do a detailed comparison, and had to upgrade my opinion on the "new" 40-150 mm.) Surprisingly, it is in these two cheap lenses where Olympus finally got it right with the "fly by wire" manual focus ring. I was unhappy with how this was implemented in all previous ZD lenses I've tried; now it is close to perfect: precise, with just the right amount of dampening action, no disengagement between the movement of your hand and what the lens is doing. An impressive job, although I'm still missing some tactile feedback when either end of the focusing range is reached. Obviously, this is important only if you perform any manual focusing; I rarely do that, and most of the camera buyers never will (although I bet many will occasionally switch to the MF by accident). Small pleasures of life: have you ever tried to put on, or take off, the lens cap with the hood mounted on? I've been complaining about Olympus caps since 2001 (E-10). After just six years, Olympus got this 50-cent accessory right: the new caps allow to do that easily; no longer do I have to buy replacements (very nice ones, by the way) by Tamron. Oh, and a replacement cap is no longer priced at a ridiculous $15; the new price of $7 is more reasonable. Overall, an excellent job with the kit lenses; the old ones were better than anyone else's, and these seem to deliver even better results, with the extra bonus of reduced weight and size. The only real lens tests published nowadays are those by Popular Photography (see here how I read them); everybody else measures the combined resolution of the lens and camera; that is usually affected by the settings used. In the E-510 this combined resolution is brought down, as you will see, by the default setting of the noise filter, so it does not really reflect the capabilities of the lens itself. The first time I saw some images done with the 14-42 mm, and noise filtering disabled, my jaw dropped down. This is consistent with the Popular Photography test of this lens. |
|
Using legacy lenses:
Yes, with adapter |
Four Thirds cameras give you unmatched flexibility in using legacy lenses, i.e., ones designed for other SLRs, especially film ones. This is because the distance between the lens flange and the sensor is 3 to 7 mm shorter than for any other SLR system I'm aware of, leaving enough room for a mount adapter to be fitted.
Yes, you will need an adapter for every lens mount you want to use, but these do not have to cost you $200 like some; a number of vendors on eBay are offering them at reasonable prices. You also have to focus by hand, even without the benefit of focus confirmation, and autoexposure is possible only in the aperture priority mode, after the aperture is closed by hand to the working value. Even then, metering suffers from some anomalies, see here. The original limitation disallowing to use image stabilization with such lenses has been addressed in the firmware update from January, 2008. On the other hand, you can find many lenses, especially those of long focal length, which will be capable of providing the larger resolution needed for the Four Thirds frame size (remember, they were designed for film cameras, with resolution needs twice as low), and those lenses can be attractively priced. While I'm not overly enthusiastic about using legacy lenses on Olympus bodies (manual focusing in the small viewfinder), many people remain undeterred, and with very good results. If you are interested, refer to my legacy lens article for some basic information and links for further reading. |
|
Sensor type:
Live MOS |
This is just a fancy name for an NMOS sensor, made by Panasonic, used in this camera. It just goes well with Live View, but really means nothing. Olympus is not disclosing the actual sensor designation, or its specifications. Now, for me the transition from Kodak KAF-series CCD sensors to NMOS is perhaps the biggest change between this model and the older E-500, E-300, and E-1. The Kodak sensors were nothing short of excellent, and the Live MOS ones remain a big unknown. As far as I understand, CCDs have a higher dynamic range and lower intrinsic noise value. On the other hand, MOS units are easier to pick-up and process the signal from, and that's why some manufacturers are moving over to them, a trend, in the SLR domain at least, started by Canon a few years ago. My intuition says that it is preferable to start from a better initial information, and keep the amount of signal cleanup as low as possible, and this is why I always was a believer in CCD sensors. In practice, things may turn either way. The proof will be in the pictures. There is a small article on Live MOS on Panasonic's Web site. Interestingly, Panasonic claims that the Live MOS offers the receptor ratio of 50%, as compared to 35% in CMOS sensors. While the concept is not defined in the article (after all, all Panasonic buyers know those things!), I understand it as the fraction of the total sensor area which is photosensitive. And then things become interesting: this means that, in spite of slightly (13%) smaller pixel pitch (distance between photosites), the Live MOS offers a photosite size larger than a CMOS sensor: by about 10% linear, or 20% in terms of the area. While I consider this insignificant, this is a recommended reading to those who claim that Four Thirds sensors cannot compete with APS-C ones because of "small pixels". |
|
Effective sensor size:
17.3×13.0 mm |
That size is a part of the Four Thirds standard. This is twice the linear size of the largest (2/3" nominal) sensors used, with very few exceptions, in better non-SLR cameras, and half of the 35-mm film frame size.
This is, for all practical purposes, very close to the 22.2×14.8 mm of APS-C sensors used in most digital cameras (some Canon pro models being a sole exception), see my article on sensor sizes. |
|
Pixel count:
Nominal 10 megapixels |
The number of photosites from which the image is recorded is 9.98 million (more exactly: 9,980,928), what, in computer terms, can be expressed as 9.52 "binary" megapixels (where "mega" means 220, or 1.049 million).
This is a lot. Actually, I believe that 5 MP is enough for anything I (or most of us) would be doing. Still, manufacturers are pushing the number up, for a few reasons:
With the precise framing of an SLR viewfinder, many times my images do not need any cropping at all. Quite often, however, an otherwise well-composed picture needs a 5% or so crop to straighten the horizon a bit, or to remove some distracting detail at the frame edge. With ten megapixels to start with, a 10% (linear) crop leaves me still with eight MP. The new Canon professional flagship, EOS 1Ds Mk. III, introduced two months after the E-510, boasts a 24×36 mm sensor of 22 megapixels, at a price of $8000 (body only); I won't even mention the weight, as it is obscene. This is the same pixel density as 5 MP on a Four Thirds frame. |
|
Native image size:
3648×2736 |
The aspect ratio, as in all Four Thirds cameras and almost all non-SLR ones is 4:3, as opposed to 3:2 in all other digital SLRs. Those inherited that ratio from the 35 mm film, where it emerged as a byproduct of the fact, that Mr. Barnack joined two 4:3 movie frames into a single 3:2 frame in his Leica prototype almost 100 years ago.
For most applications I prefer the 4:3 ratio which is generally more pleasing and fits better all standard print sizes larger than a postcard. For some landscapes we may prefer something more elongated, and for that even 3:2 is usually not enough. |
|
Color depth:
12 bits per RGB component |
Not changed from the previous models, the same as in most current cameras (except for some of the simplest models, which may use 10 bits per color (BPC). The full information is retained only if your image is saved in the raw format; in JPEGs it will be converted to When you view an image on the screen, the color depth, in all current display systems, is still limited to 8 BPC, regardless of how the image was saved. |
|
Capture sensitivity:
ISO 100 to 1600 in full EV increments |
This is another change from older Olympus models, where ISO settings above 400 were available only as an option, providing not quite the same image quality. The expanded ISO range is one of the most touted (and, possibly, most overrated) new features in the E-510 and E-410.
As I was able to check, the results at ISO 800 are quite good, and at ISO 1600 — usable; a performance similar to, or better than, that of the Canon 400D, whose high-ISO capabilities were by many seen as one of the biggest advantages of that camera (we'll come back to that in the Noise Suppression section). The E-510 allows to set the ISO only in full EV increments, i.e., 100, 200, etc., but not, for example, ISO 160. I do not consider it a limitation at all. If you think you can see a difference between ISO 200 and 250, you should be playing stock market big time, and not taking pictures. You can, however, set the upper limit to which the autoexposure logic will raise ISO if needed. This happens not only with flash, like in older Olympus cameras; obviously, they have more confidence in the high-ISO performance of the E-510. Additionally, one of the "scene modes" offers more aggressive ISO adjustments. |
|
Low-pass and anti-IR filter:
Non-removable |
The low-pass (or anti-aliasing) filter, commonly used in digital cameras, introduces some fuzziness to the image; this results in avoiding Moirè patterns, showing up on some regularly spaced detail. Obviously, this filter makes your pictures less sharp (that's why Leica got rid of it in their recent M8).
I suspect the E-510 (and E-410) may be using a less aggressive version of this filter tnan the previous models. This would allow the camera to take a better advantage of the lens resolution. My suspicion was prompted by the unusually high resolution of images with noise filtering off, see here. The infrared-blocking filter protects the sensor from capturing the IR light which negatively affects the image, especially color balance. This feature is also common. Both filters are placed just in front of the image sensor, and in some cameras they are combined into one. I'm not sure if that's the case in the E-510, but it wasn't in the E-500. |
|
Infrared sensitivity:
Exposure factor of 10 EV.
|
The sensitivity of the E-510/E-410 to infrared seems to be the same (or, maybe, slightly higher) than that of the E-500 (recent version). With the R72 IR filter on your lens, an infrared exposure of a brightly sunlit scene will need about 10 EV (a factor of 1000×) more exposure than the same scene shot in visible light (without filter).
For example, if a normal, visible-light exposure required by a scene is 1/1000 s, an infrared version of the same subject will require 1 s at the same aperture and ISO setting. The Live View is useful in IR shooting: without it the filter would have to be put on immediately before the shutter is released, after the scene has been framed without it. For more on this subject see my separate article on E-510 in infrared. |
|
Dust removal:
Yes, ultrasonic.
|
When a particle of dust (or lint, or anything else) gets into the camera's mirror chamber, as it may happen while a lens is being changed, it may settle down on the sensor, or rather on the foremost filter in front of it. This will show as a dark speck in the recorded image. The speck will be usually out of focus (fuzzy), depending on the distance from that filter surface to the sensor proper, and also on the aperture at which the picture was taken. This is best visible in smooth, uniform areas, like a blue, clear sky.
Some people believe that dust or dirt on a lens surface (including the filter in front of the latter) may cause a similar effect; I've seen and heard this many times. This is not true, as anyone who paid any attention to a convex lens ray diagram shown during high school classes will be clearly aware of. Such impurities may only cause some general softening of the image, and quite many are needed for this effect to become noticeable. Olympus addresses the problem with their patented Supersonic Wave Filter (another moniker which means exactly nothing). In this solution, the dust barrier (see the diagram at left) seals the CCD in and vibrates for one second or so at a low-ultrasonic frequency of 25 kHz when the camera is turned on; most of the particles are shaken off and stick to an adhesive surface at the bottom of the mirror chamber. (The sticky strips have to be replaced by a service center every three years or so, according to Olympus, but this depends on a number of factors.) This system has proven itself in all previous E-System cameras, being the first one in the industry. Since then, Sony, Canon, and Pentax introduced similar solutions (in spite of Canon's initial comments that they do not really need one). According to the test by Róbert Irházy of PixInfo.com, the anti-dust system in Olympus SLRs leaves all three others in the dust, as the only one which really works. While I cannot verify Róbert's findings, in four years of using E-system cameras I never experienced the dust problem (had a visible spot once, but it went away after a few frames, probably shaken-off by the removal system). |
|
Sensor cleaning option:
Yes | Activated from one of the menus, this flips up the mirror, which will stay so until the camera is turned off, giving you access to the dust barrier in front of the CCD — if you really need to clean it (I don't think so, see above). |
|
Operating principle:
Body-based, moving sensor |
Olympus is the last major SLR maker to offer image stabilization in their SLR systems. At this moment, Canon and Nikon are using IS systems built into some of their lenses, while Pentax and Sony went for IS in SLR camera bodies (the concept originally developed by Minolta).
(Panasonic and Leica, with their so far limited Four Thirds offerings, use image-stabilized lenses branded as Leitz, which will also work on the E-510 with the body-based IS turned off.) In both kinds of systems the job is done by mechanically compensating the detected vibrations of the camera/lens axis so that the image remains steady on the sensor. In lens-based ones this is performed by moving a dedicated element group in the lens; in body-based systems — by moving the image sensor itself. Proponents of the lens-based solution claim it is easier to implement and can provide better results, tweaked to a particular lens; adherers of the other do not even have to point to the fact that their system can work with any lens mounted on the camera. The body-based image stabilization should not be confused with the so-called "digital image stabilization", which is not image stabilization at all, but an exposure program, increasing the ISO more aggressively at low light levels, to allow for faster shutter speeds and thus reducing the probability of camera shake. With that advantage, I have no doubt that body-based systems will prevail: that's what the market will demand, although for some time both kinds will co-exists, even within the same SLR family (although one will have to be disabled for the other to be used). I would expect Canon to have an SLR with body-based stabilization within three years. Activation of the system in the E-510 is easy: press the [IS] button and choose one of the two available IS modes:
I've checked only Mode 1 so far. How well does it work? |

E-510, IS off
E-510, IS on (Mode 1) Both images: F=150 mm, 1/15 s These are typical examples of my two series, 60 frames each; see text. |
To avoid basing my opinions on a casual impression, I've started from an informal test, 60 frames shot with IS and 60 without, all using a shutter speed of 1/15 s at the focal length of 150 mm (corresponding to 300 mm on a 35-mm frame camera). At this length, the generally recognized "safe" handheld speed is 1/300 s, so I was more than 4 EV (or a factor of 20×) below that. The results were quite dramatic: image stabilization increased the share of clearly "good" frames from 2 to 32 out of sixty, and the fraction of obviously "bad" ones dropped from 47 to zero. This leaves no doubt: image stabilization really works. This does not answer the most frequently asked (if not the best-phrased) question: by how much does the IS lower the safe handheld speed? While I've seen this one answered in a number of sources, I do not trust a single one of them, without being able to verify the testing method used and the statistical interpretation of results. Frankly, most of the numbers claimed (for any camera) seem to be just invented. It took me some time and effort to design and execute a more thorough experiment, described in detail in another article. My results clearly indicate that the gain depends on the focal length used: I ended up with 1 EV for 14 mm, 1.6 EV for 42 mm, and 2.2 EV for 150 mm (this corresponds to exposures longer by 2, 3, and 5 times, respectively). The outcome, however, may also depend on other factors: lens weight and balance, your shooting technique, and more. There is simply no single answer to this question, and I haven't yet seen any dependable numbers for any other camera, so my results cannot be compared with anything else. Olympus recommends disabling the IS when shooting from a tripod. My experience confirms a need for that: one of my series of 16 tripod-based frames, with the IS accidentally left on, seems visibly more fuzzy than when re-shot without IS. The results do not look visibly shaken (no smear or double contours) — just like if autofocus was working wrong. Again, I'm tempted to run a more formal test of that effect to get a better grip on its magnitude. Legacy lens support. (In the original version of this report, this paragraph opened from "Now the bad news"). In a recent (January, 2008) development Olympus released a firmware update allowing to use image stabilization with legacy lenses, with no electronic coupling to the camera body. When such a lens is installed on the camera, you have to dial in its focal length, so that the IS system will be aware of the nature of camera/lens shake to expect. I've checked this feature and it seems to be working just fine. At last. Note: Turning the camera off with the IS enabled, you will hear a sound with a camera shaking slightly with what seems like a 5 Hz frequency. This may sound alarming, but it is a normal behavior; Olympus must have needed it for some undisclosed purpose. |
White Balance:
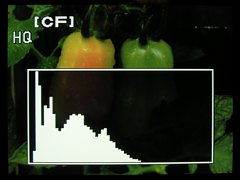
Two pictures taken 18 seconds apart, with identical settings and under identical conditions. The only difference is a slightly different framing. This shows what may happen when you depend on Auto WB, especially with mixed light sources (fluorescent plus daylight). E-510, ISO 1600, 1/125 s at F/5.6. |
The white balance setting affects the perceived color in the generated images. While most people do not realize that, we do not want the colors to be recorded truthfully (like a living room scene being reddish because it is being illuminated by incandescent bulbs) — the human brain adjusts our perception, removing (most of) the prevailing color cast, and we expect the same from a camera.
Many photographers, not just beginners, leave the camera set to Auto, hoping this will do. This is not the best idea: the Auto WB will work reasonably well only if your picture contains a clear white (and not too small) area. Otherwise you're risking that the camera's decision will be less than optimal; you may also lose color consistency between consequent frames: a series of slightly differently framed pictures may end up with quite different WB settings, definitely not nice. (See the example at the left.) Using a stand-alone, incident light meter with color temperature option is generally the most accurate approach, but very few people (mostly professionals) do that. Some cameras (like the Olympus E-1) have an external light sensor to help in WB setting, but this is only a partial solution; if you want your pictures right, simply do not use the Auto WB option, regardless of camera. At least do not do it outdoors, where choosing between one of three available presets (see below) is really not a rocket science. To give you some say in WB of your pictures, Olympus (like most manufacturers) offers a number of presets, marking each with a mnemonic icon (when accessed from the menu system, all these are accompanied with the color temperature value in degrees Kelvin):
(The color temperature concept is not really applicable to fluorescent light, so the latter are "equivalent" values, but this is a technicality.) There is also one user-defined setting, to which you can assign any color temperature value (in 50°K increments) for a quick recall. Artificial light sources may differ strongly in color temperature; for example, a tungsten bulb may have a color temperature from 2000°K to 4000°K. Under such (and not only) conditions, a more precise way to set the white balance is by reference: letting the camera take a trial picture of a white or neutral-gray area, and to analyze it without saving to the memory card; the resulting WB estimate will then be stored in an easily accessible setting. This requires the [Fn], or Function, button to be assigned to Reference WB; the feature cannot be accessed otherwise (like, from example, from the menu). This feature worked very well on the previous E-System cameras, especially under incandescent light, as I was able to check both by a casual examination of results and by checking the RGB values in an image editor. The white balance settings are applied during the raw-to-RGB conversion of the captured image, therefore pictures saved in the raw format (ORF) are not affected. The measured WB, however, is stored in the header of an ORF file and can be applied when the raw file is converted to RGB on your computer. Each of the presets (including Auto and Reference, but not Custom) can be modified by applying additional corrections in two color planes (red/cyan and green/magenta). These adjustments are persistent: remembered when a preset is changed or the camera turned off. This is a way to customize your camera's color response to your liking. All corrections can be also set to a common value, or reset to zero in a single operation from the menu system. The adjustments have a range of ±7 steps of size unspecified by Olympus; this is not much of a problem, because you set them by trial and error anyway. |
|
WB bracketing:
Three steps each in two color planes; three or nine frames total. |
When this option is used, the camera takes just one exposure, but saves it as a number of JPEG files, applying various color corrections during the raw-to-JPEG conversion. Three files are saved if bracketing is applied to one dimension, nine — when to both (red/cyan and green/magenta). The magnitude of color shift between different versions can be set to 2, 4, or 6 "steps", presumably the same ones as those used in WB adjustment described above.
Strangely, this option is also available in the raw format, where the camera writes three or nine ORF files to the memory card. This is not smart at all: all these files contain identical raw image information, differing only in the WB information in the header. Generally, I find the WB bracketing function useless: it is faster to take one frame saved in the raw format and then try the various color adjustments in postprocessing. |
|
Noise suppression:
Yes, both static and random |
Noise in digital camera images is a sum of two components: static and random. If you are unfamiliar with the subject, refer to my noise article as a general introduction. The E-510, similarly to most SLRs addresses each component in a different way.
The static noise, predominant at long exposures under low light, is reduced by dark frame subtraction: immediately after the picture is taken, the camera records another frame at the same settings (ISO and exposure time), but without opening the shutter at all. That frame is then subtracted from the original one. This approach works quite well, especially, if not only, with the hot pixels (see, again, the article mentioned). Olympus refers to this as noise reduction. Because of the extra exposure of the same length as the original one, and extra processing involved, this feature takes an extra time before the camera is ready for the next picture. Time is not the only penalty for static noise reduction. The random component is increased in the process. This is why Olympus activates it only at long exposure times: 8 s and up at ISO 100, or 4 s and up at ISO 200 and above (don't try to find this in the manual). At faster speeds it will not kick in, even if set. As my test results with the E-500 indicate, the best solution would be to activate the noise reduction at a shutter time inversely proportional to the ISO value; this conclusion should also hold for the E-510. Interestingly, Olympus changed the way how the noise reduction works if the image is saved as a raw file. In previous models that file contained also the dark frame, to be subtracted only during the raw-to-RGB conversion in postprocessing, therefore it was larger. In the E-510, the file size is not affected by the process; it looks like it already contains the result of subtraction. The random noise occurs, with differing magnitudes, at all light levels, and all camera makers apply some filtering to smooth it out. A side-effect of the process is, unfortunately, some loss of image detail — although the filter algorithms make this not so obvious by trying to preserve line sharpness and/or applying some sharpening afterwards. What we end up with is an image with less noise, less detail, and relatively sharp contours. This is called noise filtering. What I like very much about the E-510 is that you can adjust its magnitude to your liking. While the setting is buried deep in the menu system, this is a very powerful feature, which I didn't realized until I tried it. I wish this setting could be assigned independently to (and memorized for) each ISO value, or, even better, to every combination of that value and image mode (Vivid, Natural, and Muted). This is only natural: image modes are digital equivalents of various film emulsions, and grain characteristics is an important signature of these. The sharpening degree is already assignable to individual image modes, so doing the same for noise filtering would be just a logical extension; these two are tightly related. Noise filtering can be set to one of four positions: Off, Low, Standard, and High; each of these has a different effect at different ISO settings, and the differences between the four are larger than I expected. Only after some extensive experimentation I realized how much is the image sharpness affected by noise filter setting. In this context I find the default Standard setting excessive at any ISO; my preference is Off for ISO 100 and 200, maybe even ISO 400, and Low above that (for full details see a separate article); this, unfortunately means that after changing ISO I have to dig into the menu system to adjust the noise filter — a cumbersome process. This decision by Olympus can be explained by a noise hysteria around the previous Olympus models. People who wouldn't tell a sharp image from a contrasty one would yell Noise! any time they saw any on a computer screen in a full pixel scale magnification, at the same time happy with blurred images from some other cameras (including the Digital Rebel). A noise and sharpness comparison between the E-510 and 400D can be found in a review at Digicam Review, and it is quite revealing. Only at ISO 1600 has the 400D a slight advantage of lower noise, at a heavy price in sharpness loss, visible at all ISO settings. These Digicam Review findings may raise some eyebrows, and I am not in a position to confirm or contradict them. They may, or may not, have something to do with lenses used — the Canon kit zoom, according to many, is of rather low quality; the article does not mention what lenses were used in the comparison. The DP Review includes a similar comparison in a review of the E-410 (which is image-wise identical to the E-510). This comparison, done with prime lenses, shows the Olympus noise a bit lower (including ISO 1600), but I can see the Canon images are (just a tad) sharper. The comparison, however, was done with noise filtering set to Standard, which makes it less meaningful; actually, this may not really contradict the results mentioned above. More, any noise comparisons based on the standard deviation of pixel luminance (and many I've seen use this metrics) are wrong and misleading. At high pixel counts, the noise uniformity (lack of autocorrelations) is more important than just its amplitude, as anyone familiar with fine-grained film will know. In either case, I do not think that the differences discussed are strong enough to be visible in 12×16" (30×40 cm) prints viewed from the "standard" distance equal to the print diagonal. All this said, I still think that the first thing a new user of the E-510 should do is to set noise filtering to Low at most, and start from there. Too bad most of them will never bother doing this. So, how is the noise in the E-510? Very well under control, thank you. It is tight and uniform, free of the chroma component (colored specs) prevailing in the older models, very low up to ISO 400 (even with noise filtering off), low at ISO 800, and moderate at ISO 1600 which becomes a useful option for available-light shooting. At longer (one second or so) ISO 1600 exposures, some images exhibit horizontal banding, a problem common to many digital SLRs. I have to investigate the matter further to say when this is most likely to occur, but this does not stop me from using this setting for handholdable shutter speeds (for which it is intended: if I have to use a tripod, I may as well go to ISO 100 anyway). |
|
Color space:
sRGB or Adobe RGB |
Adobe RGB can be used for better color rendition (wider gamut) with applications which can take advantage of it, especially for professional printing. I never had a need to use it.
The worst happens when an inexperienced user sets the color space to Adobe RGB without knowing why (just because it must be better!) and then views or edits the images with applications which are not set to use that. Advice: if you are not sure, leave this setting alone! |
Picture Modes:
|
I liked this option in the E-500, and I like it in the E-510; this is like defining four different imaging profiles (like different kinds of film) and then quickly choosing between them.
Too bad the manual does not say anything about these four choices except what anyone can figure out from the names. I find this offensive, but this is not my first issue with the Olympus publications department, and not the last one. Each of these four "films" may have a number of detailed settings assigned to it: contrast, sharpening, color saturation, and "gradation". The first three can be adjusted within ±2 notches, for the last one, see below, we have a choice of Normal, High Key, and Low Key (again, it would be better not to explain them at all in the manual, than keeping the explanations as they are). Once these settings are defined, they will stay attached to the given picture mode and recalled every time that mode is used. Very nice. The remaining picture mode is Monotone (which translates into English as "monochrome"). I was skeptical about its usability in the E-500, but I'm beginning to change my mind. Unless you write your images as ORF files, it may come handy, as it seems to give somewhat better results than saving a color JPEG and then converting it to monochrome, especially when used with a "color filter" option (see below), and especially in infrared. The monochrome mode skips the adjustments of saturation (obviously) and gradation (why? it should be perfectly applicable here), adding two others: color filter and image tint. The first option is similar (but not quite equivalent) to using a lens filter: none, yellow, orange, red, and green. The second allows the monochrome image to be slightly tinted in a number of hues (quite nicely chosen, by the way). Olympus removed the "sepia" mode (which was present in the E-500) realizing that it is nothing else than a tinted monochrome. They are right, that was just illogical. |
Image adjustment:
|
All these adjustments are applied during the raw-to-RGB conversion, so they are not essential if you save your images as ORF files (they are, however, stored in the ORF headers so that can be recalled during postprocessing).
As I mentioned before, these adjustments are set and memorized independently for each of the Picture Modes discussed above. What I am missing now in the E-510 is a possibility to attach also the noise filter setting to a picture mode. This would be perhaps my favorite feature, even at the expense of removing the "gradation" setting altogether. Another possible enhancement would be to assign the detailed image parameter set not just to the picture mode, but to its particular combination with sensor gain (ISO); after all, a contrast setting appropriate for ISO 100 may be not so good for ISO 400. This, however, is not as simple as my previous wish. |
Lens correction:
|
The light fall-off (or vignetting) is an effect seen, to a varying degree, mostly with wide-angle lenses, especially at full apertures. It demonstrates itself as gradual darkening of image corners. Some of it is due to the lens itself, some — to the directional response of the sensor.
A remedy for it is available as an option (disabled by default) in the E-510, accessible from the menu system as "Shading Compensation". (There is no such term like "shading" in the English photographic terminology; this is another example of the creative abuse of that language I cannot get used to.) Every Four Thirds lens transfers its fall-off characteristics to the camera, which then may compensate for the effect during raw-to-RGB conversion. (This means that images stored as raw files will not be affected, although they carry the information to be used in postprocessing, if so chosen.) If you use the Olympus Master or Studio software for postprocessing, you may postpone this step; it can be applied to both raw and JPEG files. The lens distortion, also most obvious at wider angles, can be corrected in a similar way, but in postprocessing only, based on the lens data embedded in the image file. It can be applied to raw or JPEG files. |
In-camera image editing
|
These functions can be applied to the picture which is being viewed. The raw-to-JPEG conversion applies the current camera settings (as opposed to those used at shooting), including the white balance, and saves the result as a new JPEG file. The other operations can be only performed on JPEG images.
I do not consider any of these functions really useful, therefore I'm not going to go into any detail here. |
Image file format:
|
The ORF files save the information as picked up from the CCD, without any processing. The individual signal values for red, green, and blue photosites are preserved, without being converted (interpolated in two out of three components) to RGB pixels.
For more on raw files, see my Raw Image Format article. For most practical purposes (including all I do), JPEG files are just fine. While that format uses compression in which some image detail is lost and some compression artifacts introduced, at low compression ratios these effects are really negligible. A new feature in the E-510 is that ORF files are compressed, using a lossless compression scheme. This reduces the file size: the "new" raw files are about 9-11 MB each, while the uncompressed ones in the E-500 were 13.6 MB in spite of smaller amount of information contained (8 megapixels as opposed to 10). In this camera, Olympus decided to drop the TIFF format support. It will not be missed at all. On the other hand, we are still waiting for the first camera manufacturer who would bite the bullet and support JPEG 2000, a superior format. |
|
JPEG compression:
1:2.7, 1:4, 1:8, and 1:12 |
These are nominal values; the actual compression ratio will vary from image to image.
The 1:2.7 (best quality) compression is practically lossless, better than most of us actually need, but it produces largest files. Usually I set my compression to 1:4 and this is more than good enough. Only for some test samples I turn to 1:2.7, but even this many be some overkill. Compression rates are not adjusted directly: they are assigned to image quality presets, and only the latter can be selected before a picture is taken. |
Average file size:
|
These values are quoted by Olympus; obviously, with a compression applied the final size will always depend on the particular image: those which less detail will compress better.
A simple experiment: take a picture from a tripod; then switch to manual focus and use it to get a really blurred picture. The second file will be visibly smaller than the first one, at least in the JPEG format. My experience shows that usually the averages will be 10-15% lower than those in the specs: about 6 MB for 1:2.7 and about 4 MB for 1:4; I didn't bother to check higher compressions. A hundred or so raw files I just looked at had sizes ranging from 8.6 to 11.4 megabytes, with most between 9 and 10 MB. Olympus compression ratios are usually lower (i.e., quality: higher) than for other makers. For example, the Canon 400D Fine and Standard modes generate file sizes similar to those at 1:4 and 1:8 on the E-510, respectively. |
Image size (pixels):
|
A wide choice, but do we really need it? Imagine taking a series of pictures saved as 1024×768 VGA files, intended for Internet use, and then discovering that some of them deserve being printed to a poster size. No chance to go back!
The only options which may be useful in some situations are the two largest non-native sizes, still printable in formats larger than a postcard; they can be used in an emergency, when we are running out of card space far from home. When one of the non-native format is used, the picture is being taken in full resolution, and the raw picture is being resized only in the process of being converted to RGB. It is unclear if the conversion is done straight to the reduced resolution, or with the intermediate stage of a the full-size RGB. While the latter is simpler to implement, the former may, theoretically at least, provide better results. But do we really care? |
Image quality presets:
|
These, as explained above, are applicable only when images are saved in the JPEG format. The Control Panel allows you to choose between these three options (in addition to raw), but two of these can be pre-defined as combinations of pixel size and compression. Thus the presets are:
This is a setup used for a number of years in most Olympus cameras, and it reminds me of an indirect electoral system. While I don't like it too much, I can live with it. My advice is to set the HQ and SQ presets to your liking once and forever, and then use them as if they were hardwired. |
Meta-information stored:
|
The JPEG standard allows for a supplementary information (i.e. one which is not a part of the actual image) to be stored in the image file. Most of various camera's raw formats, ORF is this number, offer the same possibility. This is referred to as EXIF information.
Many popular image browsing or processing programs allow you to access the EXIF information, so does the Olympus Master included with the E-510. Unfortunately, most of these programs allow you only to see a part of it, not always the most important items. Well, the Olympus Master is actually one of the worst programs in this aspect, leaving out lots of interesting stuff. OK, so you know that the basic shooting information, like camera type, focal length, shutter, aperture, ISO, and white balance settings are stored as EXIF data, and most programs would display those items. But what about some other juicy morsels, like, just for example, focusing distance, dept-of-field-range, or body and lens serial numbers I was able to extract from E-510 files? I cannot see any explicit data on two interesting things: image stabilization and noise filtering. I suspect, however, that they are hidden among parameters cryptically named as, for example, Olympus Image Processing 0x0303. One day I'm going to find this information. We all know that many image files contain embedded thumbnails in the EXIF data; this is also the case here, and the thumbnail size is 120×160 pixels. It is not a common knowledge, however, that Olympus files (ORF or full-size JPEG type) also contain a smaller version of a JPEG, used for in-camera, magnified preview. This image is 1200×1600 pixels (approximately 2 MP). It is quite heavily compressed, usually to 300..400 kB, which gives a compression ratio of 1:15..1:20. |
Storage medium:
|
The camera has a two card slots, one for each type, and you can switch between them on the go. Although this solution does not offer much above a single card, somehow I like it — without a real reason.
Compact Flash, the oldest surviving standard (remember SmartMedia which once had more than 50% of the market?) still seems to offer most advantages, except for size, which may be too large for compact cameras. These cards have on-board controllers, which means that the increased performance of newer models can be more easily utilized on older cameras, in addition to fewer compatibility problems. With the now defunct SmartMedia, almost every increase in capacity required an update to camera's hardware, and those were not always released. Unfortunately, the situation with xD-Picture is similar (although not quite as bad). Compact Flash offers largest capacity, fastest writing speeds, best compatibility, and lowest prices, therefore the choice is a no-brainer. Still, to utilize the second slot I would suggest getting an xD-Picture card (the faster "H" type). You can use it when running out of CF space, or for backup of selected images from the Compact Flash (the camera offers such an option). The E-510 is capable of taking advantage of fast writing speeds of modern cards; the writing times are quite impressive. For example: storing an ORF file on a 2 GB SanDisk Extreme III takes about 1.3 seconds (JPEG takes approximately the same, as some time is used for raw-to-RGB conversion). The newer Extreme IV does not seem to offer visible advantages beyond that. For more on this see my article on card-writing speeds. |
|
Dual-format saving:
Yes, ORF+JPEG | I never had a need to use this feature, but some people may. Plus, it looks good on a specs checklist. |
|
Computer interface:
USB 2.0, storage-class device |
At long last, in this camera Olympus moved to the real USB 2.0 connection, officially referred to as USB 2.0 High Speed (as opposed to the Full Speed flavor, which is far from the full speed USB 2.0 is capable of).
The resulting increase in transfer rates is dramatic, as long as a fast card is being used. Transferring 150 JPEG image files (550 MB) from the E-510 using the Extreme III CF card to my cheap laptop took 102 seconds; the same files took 667 seconds when the card was plugged into my E-500. That's more than 5 MB per second, a speed increase by more than six times! Some sources quote transfer rates not in megabytes (MB/s) but in megabits per second, Mb/s (lowercase 'b'). 5 MB/s is the same as 40 Mb/s. I clocked a similar speedup (by a factor of 7×) on my three-year old desktop. Surprisingly, when I copied the same files to an Extreme IV card, the transfer rate went down by 10%, but such small differences may be due to different physical location of the files on the solid-state disk. I don't think this warrants any further investigation. |
|
Dual viewing:
|
In addition to optical, through-the-lens viewing, the E-510 adds a possibility to preview the scene as picked up from the imager, on the LCD monitor.
This is not intended as a replacement for the regular viewing mode, but rather as an option to be used only under circumstances when its advantages prevail above disadvantages. For a more detailed discussion of this viewing mode refer to the Live View section near the end of this article. The rest of the present viewfinder section will deal only with the SLR viewing. |
|
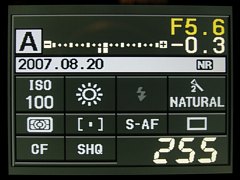
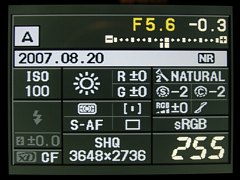
SLR viewing system:
Pentamirror and groundglass; 95% coverage; 0.92× magnification
Information shown:
|
The pentamirror is less expensive and weighs less, but provides a somewhat less bright image than a pentaprism. In practice, I wasn't able to see any difference between both, using the E-1 and E-300 side-by-side.
The focusing screen is not user-changeable. It has three AF point marks (with blinking confirmation LEDs) and a circle marking the center-weighted metering sensitivity region. As in the E-500, I find this circle useless and distractive, but this may be personal. The 95% coverage is defined, as customary, in linear terms, and it means that about 90% of image area (0.952) is shown. Camera makers prefer to quote a linear value without any explanation; if they were selling land, then 50% of a square mile would really mean 0.5×0.5 mile squared. The information shown to the right of the finder image is quite comprehensive, but, as in previous E-System models, it is difficult to see, especially for glass-wearers. The finder magnification, 0.92× is barely better (no noticeable difference) than in the E-500, perhaps one of the weakest points of this camera — but the finder is still usable, as long as you do not insist on manual focusing (and most people don't). This magnification, as specified by all digital camera makers (let me spare you the details how it is defined), is not a meaningful parameter when cameras of different sensor sizes are being compared. For comparability (showing all in terms of the 35-mm film frame), the quoted finder magnifications should be divided by the focal length multiplier (2 for Four Thirds, 1.62 for Canon, 1.53 for Nikon APS-C). Thus (putting the aspect ratio differences aside and speaking in terms of diagonal size), the "equivalent" finder magnification for the E-510 is 0.46× (0.92/2), for the Canon 400D it is 0.49× (or the quoted 0.8/1.62; slightly larger), and for the Nikon D40x — 0.52× (0.8/1.53). Now, the upcoming E-3 specifies finder magnification as 1.15×, which, after normalization, gives 0.57× — almost 25% more than in the E-510. (The image size differs even more because of the 100% coverage, not 95%). In a comical twist, Popular Photography uses a set of guidelines to convert finder magnification values to verbose descriptions. The problem is that they've never updated these to accommodate various frame sizes, and thus, for example, the 0.92× value for the E-510 is considered "excellent", while 0.8 for a Canon 400D — just "very good", both providing the same viewing experience equivalent to 0.5 on a 35-mm SLR; very poor. Still, the Canon model gets shortchanged in this snafu. I was hoping the E-510 will have a larger finder, but this did not happen. I understand that doubling the finder size reduces its brightness by a factor of four, but maybe a solution like that in the E-10/E-20 would work: increasing screen transparency at the expense of manual focus precision (your eye can adjust to the shift of the aerial image); after all, all people use the viewfinder for viewing, and only a few — for manual focusing. |
|
Diopter adjustment:
From -3 to +1 diopters | This is a typical range. The adjustment knob is quite crude in action, barely adequate. |
Other features:
|
The eyepiece cover should be used when your eye is not protecting the eyepiece from stray light: this affects light metering accuracy. In practice, I use it when the camera is mounted on a tripod, especially shooting in infrared.
Unfortunately, this small accessory has not been improved from previous models: a flimsy piece of plastic, easy to misplace. I'm not talking about an eyepiece shutter, activated with a small lever, like in more expensive cameras, but a smarter design of the existing eyepiece blind, attachable to the camera strap, would be a nice and cheap solution. The eyecup included with the camera is EP-5, good enough. If you wish, you can replace it with a larger EP-6. There is also a magnifying ME-1 eyecup available, enlarging the viewfinder image 1.2×. All these are described in a separate story. |
|
Depth-of-field preview:
Yes. |
Some SLR users like to preview the depth of field by closing the aperture down to the value set (by hand or by the autoexposure system). This is quite useful with larger finders available on full-frame cameras, less so with small ones like the one in the E-510.
Still, the camera provides this option, but at a price: you have to dedicate the sole assignable function button, [Fn], to activating it. You will be then unable to access other functions which also can be assigned to that button; for example, setting the white balance by reference. You can, of course, reassign the [Fn] button on the fly as you need it, but this is a cumbersome procedure, requiring a tedious search through the settings menus. Oh, well, I'm not bothered by this but you may be. |
|
Mirror lockup:
Yes: shutter delay |
To avoid camera vibrations caused by the mirror slap, you can set a delay between that (activated with the release button) and the actual shutter action. You may want to use this in critical tripod applications, but, frankly, I rarely bother. The delay can be set to any whole value between 1 and 30 seconds and has been hidden at the very bottom of one of the menus, right next to flash bracketing (where else?).
In yet another burst of linguistic creativity, Olympus documentation refers to mirror lock as Anti-Shock. |
|
Type:
Mechanical, focal-plane, electronic control | This is what all digital SLRs have. For a general information on this type of shutters, see my article here. |
| Speeds: 60 s – 1/4000 s, up to 8 minutes in bulb setting |
This is generous and, again, common to most digital SLRs. (Of the cameras I've tried only the Nikon D200 goes up to 1/8000 s). The long end of 60 seconds is more than in the competition (other current sub-$1000 models go to 30 s), but this is really of no importance. (Still, my 60-second, ISO 100 frames are beautifully rendered).
The whole range is available in all exposure modes, but at higher ISO settings they may exceed the autoexposure metering range, so you must know what you are doing. |
|
Max. flash synch speed:
1/180 s | This is the "official" value. In reality, you may often synchronize a (non-dedicated) flash up to 1/320 s, which I was able to check using a thyristor-automated flash from Adorama, and camera set to manual exposure mode. See the flash section for more. |
|
Release:
Soft-touch, electronic | The same as in previous models: no better, no worse. A bit too stiff for my taste (this increases the risk of camera shake). |
Modes available:
|
These are accessed with a dedicated button placed at the left of camera's top. The self-timer can be set to 2 or 10 seconds, and the IR remote delay — to 0 or 2 seconds.
The self-timer can be canceled by pressing the drive button again during the countdown. What I do not like is that there is no audible confirmation that it has been activated with the shutter release. I also believe the mirror should go up as soon as the release is pressed in the self timer mode. This would address my previous complaint, at the same time providing the functionality of mirror lock. The latter could be then removed from the menu system (simplifying it a bit), at the same time becoming accessible externally. I really do not need to set the lock delay to exactly 17 seconds; a choice between 2 and 12 is enough. Simpler is better. |
|
Sequential rate:
3 FPS up to 8 or more frames |
In the sequential drive mode the camera keeps taking pictures as long as the shutter release is kept pressed, or until the internal memory buffer gets full. In the latter case the rate will slow down do about one frame per second (or whatever it takes to write the image file, depending on the card used), but the shooting will continue. You can also start another sequence while the previous one is still being saved.
My informal tests has shown that I can get 10 or 11 raw frames within about 4.5 seconds, or 25 SHQ (1:2.7) JPEG ones in 9 seconds until the buffer fills up — a rate of about 2.5 FPS. At the compression of 1:4 I've given up after 60 frames in 19 seconds (3 FPS). The card used in this check was SandDisk Extreme IV, the fastest one I have at my disposal. These numbers are applicable to the Single AF mode, in which the autofocusing is done only at the first frame. In Continuous AF the camera re-focuses before each frame, so my clocked rate dropped to (almost exactly) 2 FPS, but the sequence length, in SHQ at least, increased (I didn't bother to check by how much). The rate may, of course, depend on focus conditions. The continuous shooting rates and sequence lengths are what I would expect from a camera in this class (for example, the Canon 400D gets up to 28 frames at 3 FPS in 1:4 compression). Anything faster calls for a pro model, with the appropriate price in terms of money and carrying weight. Or just consider buying a video camera.
|
|
Remote release:
|
Adding the wired remote option (RM-UC1, $50) at long last addressed one of my gripes about the E-500. It uses the USB/video socket in the camera's back and works just fine. Externally, the RM-UC1 looks exactly like the RM-CB1 for some other cameras; it even has a holder for the screw-on remote socket cover no longer present on cameras it works with.
Wireless remotes (RM-1 or RM-2) used to be included in the box with most of the Olympus cameras until about three years ago. They will both work with the E-510, but the $30 (RM-1) price is, to put it mildly, a rip-off. I'm glad I have like six of them around the house. The RM-1 also has zoom out/in buttons, which on the E-510 are used to open and close the shutter in the Bulb mode (RM-2 will not work at all in that setting). The Olympus Studio software ($100) allows you to access all settings (except for zoom), trigger the camera, and save images to the computer. It may be useful in studio or lab settings. |
|
Time-lapse sequences:
No | People, pleeez! What does it take to provide this feature, even if it is not of the first importance? It can be done entirely in firmware: take away the most useless features (scene mode "guide", DPOF printing, white balance bracketing), and give me this one, in case I need it one day... |
|
Light metering:
Full-aperture TTL, an array of 49 sensors |
Through-the-lens (TTL) metering at full aperture is a standard on all modern SLRs, digital or film. The E-510 uses a matrix of 49 (7×7) sensors to do that, measuring the light off the viewing screen.
The metering seems to be precise and consistent. Rumors about a tendency to underexpose or overexpose in the E-510 (I've seen both) arise, most probably, from the author's unfamiliarity with using autoexposure systems, especially in high-contrast situations; see also the next item. |
Metering modes:
|
ESP, or Electro-Sensitive Pattern is an Olympus' term used for all metering systems in their cameras for the last ten or twenty years, regardless of how these systems worked. It means nothing; another widespread industry practice, offending your intelligence. It really is a kind of matrix metering with a number of sensors measuring the light in different image areas; then some smart averaging algorithm comes up with the proper exposure.
Any exposure system can be fooled: the camera does not know what the photographer considers the best tonality for the image. Is this uniform area a sandy Caribbean beach, or a dark, volcanic beach in Costa Rica? How dark do you want it to be? Does this bright part contain some detail you want to preserve, or can you afford to have it rendered very high, maybe even burnt-out? Do professional photographers use external, incident-light meters because they are stupid and have too much money to burn, or, maybe, they have a reason not to trust the TTL metering of their (often expensive) cameras? This is why most cameras have an option of exposure compensation, and using it is the first photography skill a novice has to learn. Too bad many testers do not know this and often stick to "all-factory settings, no adjustments" policy of taking sample pictures. My preference is to keep the brightest parts of the image from running out of dynamic range; therefore I tend to use lowered contrast setting and a negative exposure compensation when the tonal range of the scene is wide but the brightest parts are too small to be properly recognized by the metering zones and/or algorithm. Usually I vary this compensation between -0.3 and -0.7 EV when using the matrix metering mode; possibly just a bit less than with the E-500. You can also switch (from the menu system only, why?) between a "regular" ESP metering mode, and the ESP+AF one, in which the averaging algorithm assigns greater weights to the matrix segments close to the point used to autofocus on. The center-weighted mode averages the image area brightness with weights falling off from the center out. This is a robust and predictable approach, a choice of many photographers, especially the film-era oldtimers. Frankly speaking, I'm not using it at all; maybe I should? Spot metering uses the information from the central 2% of the image area. An experienced user may get very good results from this approach, knowing where to point the spot (that area will be rendered at the standard 18% gray level). There are also two extra flavors of the spot metering mode: Highlight Spot and Shadow Spot. These will render the metered area as a highlight or a shadow, but it is unclear and undocumented at what level, so this can be learned only by experimentation. I've never felt any need for these options, preferring to use a regular spot mode plus exposure compensation, like in "I want this to be two steps above the standard 18% gray". This is faster, simpler, and most flexible. |
|
Metering range:
EV 1 to 20 in all metering modes (ISO 100, F/2.0 lens) |
This is not the most clear way to say what exposures the camera will be able to meter properly, although it allows for comparisons between various cameras: the wider the range in each direction, the better.
Simple arithmetic can be used to translate these specs to something more meaningful: Note that this does not mean that the E-510 can meter exposures only up to two seconds. For example, take the shorter "kit" zoom at the wide end, with the maximum aperture of F/3.5. Two seconds at that aperture is the same exposure as 80 seconds at F/22. Anyway, the metering range for the E-510 is similar to what other cameras in this class offer. |
Exposure control modes:
|
This is as expected from an SLR, which will be, on average, used by more experienced photographers than other camera types.
In the program mode the camera adjusts both the shutter speed and aperture. Olympus program modes (and many others) use the 45° line approach, modified to account for lens sharpness degradation occurring at smallest openings due to light diffraction. |
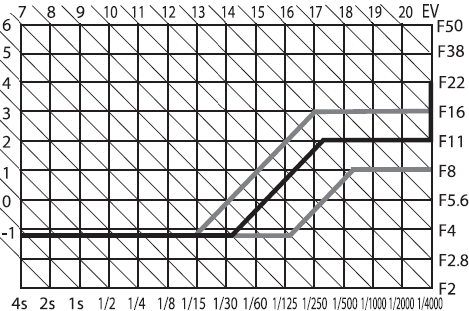
E-520 exposure program for an F/3.5 lens at F = 14 mm (Graph by Olympus)
The correct version is shown below.
E-620 exposure program for an F/3.5 lens at F = 14 mm (Graph by Olympus) This applies to the E-510 as well. |
This is shown as the dark line in the accompanying graph (modified from the User Manual). As the light level increases (EV numbers are shown next to diagonal lines), the shutter and aperture settings change as follows:
The program can be shifted towards faster or slower shutter speeds by turning the control wheel; the aperture will be adjusted to keep the exposure constant. This is shown in the graph as gray lines, for one negative and one positive shift value. Note that program shift also moves the horizontal line segment [3] up or down. While the graph does not show such a move for segment [1], shifting the program towards slower shutter speeds actually moves that part up. I've discovered that only when reviewing the E-620 in 2009, comparing both cameras side-by-side. I think I've checked this when originally reviewing the '510! Is it possible that this change in behavior was introduced in one of the firmware updates? In any case, the Olympus graph reproduced here no longer reflects the reality (for shifted program, that is). ANother opicture, reproduced from the E-620 manual, shows how things really are. I consider this feature not really useful: to gain more control over the shutter speed or aperture, it is better to switch to shutter or aperture priority. The program shift is activated with the control wheel alone, no buttons pressed. This can be easily done by accident. The shift is marked by a small 'S' next to the 'P' program symbol in the Control Panel, easy to miss. Once you discover the change and want to revert it, you will not know in which direction to turn the wheel, as the display shows neither the shift direction nor its magnitude. The fastest way is to leave and re-enter the program mode by turning the mode dial back and forth — clumsy. This is an example when an extra feature, looking good on paper, does more harm than good. You can assign the "bare" wheel functionality in program mode to exposure compensation. While it also can be accidentally modified, it is clearly visible and easy to adjust in the desired direction. The program shift is then no longer available. That's what I'm using on my cameras now. Aperture and shutter priority work as expected: you set one parameter and the camera adjusts the other. Time ("bulb") exposures allow for manual shutter timing up to 8 minutes: press the release button, and the shutter remains open as long as the button is kept pressed. While using the camer's shutter release in this contecxt does not make much sense, the button on the optional, wired RM-UC1 remote works the same way. The name itself goes back to the times when a photographer would open the shutter, manually fire a flash bulb (these were small bubbles filled with magnesia, single-use) and then close the shutter. The Auto setting is essentially the same as Program, except that it disables the program shift and reverts most of the settings to their defaults — still allowing you to modify them. The modifications, however, will last only until you leave the Auto mode, when the camera will revert to whatever you have set before entering it. Not having a need for the Auto mode, and without a clear description in the manual, I misunderstood the general principle behind it in the E-500. After getting deeper into the subject with the E-510 (in which it works the same way), I had to revisit my E-500 review and correct it. In the last three years I find myself doing 90% of my picture taking in the aperture priority mode, having moved from program after getting a better feel on what depth of field is provided by various apertures and focal lengths in the Four Thirds format. |
|
Specialized programs:
18 "scene modes" |
By setting the mode dial to Scene, you can use the LCD monitor to choose between one of the eighteen "scene modes", with plain English names and pre-packaged combinations of camera settings which the designers deemed as most useful in a given kind of shooting.
The selection process is accompanied by small example pictures and brief descriptions; for example: Portrait: For taking a portrait-style shot, or Children: Shooting active children. (No, I'm not inventing this!) In addition, some of these descriptions are unclear, like: Macro: Best for close-up pictures or Nature Macro: Best for close-up pictures of small objects. Assuming I've decided to use the "scene modes" — how do I choose between these two? To make things worse, Olympus never bothered with documenting what these presets actually do, but here, perhaps, they were right: people using them are very unlikely to read. I'm not going to discuss, or even list, the eighteen "scene modes"; you can find that in some other reviews and, if you are reading this, you are unlikely to need or use them. Let me only mention two, somewhat less trivial than others:
While in one of the "scene modes", you have no access to most of the camera function adjustments. although this depends on which mode is selected (in a way which is not always obvious). Five presets similar to the "scene modes" described above can be also selected directly from the Mode Dial. There is, however, a difference in how they work: when accessed from the dial, the modes do allow for most adjustments. (A strange exception: the image mode cannot be moved off Vivid. Why?) Enough about that. Everyone on this market has to have the "scene modes", to avoid being accused of skimping on features. The Canon 400D and Nikon D40x have "only" five, but I consider that rather an advantage. |
|
Exposure compensation:
From -5 to +5 EV. |
You can pre-set the step with which this is done: 1/3, 1/2, or 1 EV. While a compensation beyond ±2 EV is a rare need, it may sometimes come handy: for example, I'm using the camera's metering adjusted by +5 EV when shooting in infrared.
Exposure compensation is done by pressing a dedicated [+/-] button next to the shutter release and then turning the control wheel. If you wish, you can additionally assign this function to the control wheel alone (the program shift will then no longer be available, see above) — but only in the program mode; in shutter and aperture priority you'd still have to use the button. When the adjustment is being made, the LCD monitor lights up, even if it was turned off. This is mildly annoying if you do the adjustment while looking through the viewfinder. |
|
Exposure bracketing:
Three frames |
The bracketing step can be chosen, again, as 1/3, 2/3, or 1 EV (if your exposure adjustment accuracy has been pre-set to 1/3 EV), and as 1/2 or 1 EV (if to 0.5 EV). The frames are shot starting from the non-modified one, which is reasonable.
This may look good, but the implementation is flawed. First of all, pressing the release button will not shoot all three frames automatically: you have to either press it three times, or switch to the sequential drive mode. Mercifully, in the latter case the sequence will stop after three frames, so you will not "overshoot". In the former, a changed color of the BKT indicator will show that you are in a middle of a bracketed series, but this may be hard to see in direct sunlight. My second complaint is that autobracketing can be activated only through the menu system, and not directly from the Control Panel. If that's too difficult because of lack of space, it could be included into the drive mode (with the step setup remaining in the menu, fine with me). This is one of the two adjustments to which I'm missing an easier access; the other is noise filtering. Addressing these concerns would have made the control system in this camera exemplary. Last but not least, in some situations having an option of a five-frame bracketing sequence would be useful — certainly more than some other features which have been included. |
|
Autoexposure lock:
Yes |
By default, the autoexposure locks when you half-press the shutter release, and so does autofocus. If you want to separate these two functions, pressing and holding the The way in which the autoexposure and autofocus are used is largely a matter of the photographer's habits and preferences. Therefore I'm glad Olympus allows to customize these functions in three different aspects.
All this may look complicated, but you do it just once to customize your camera (unless your preferences change, but this does not happen every day). For details, refer to the proper section of my E-500 customization article. |
|
Autofocus:
Passive TTL, phase-detection |
As far as I know, all digital SLRs do autofocusing the same way. The main mirror has some semi-transparent areas, through which a part of the of the light passes to a secondary mirror, hinged on the back of that one. The second mirror reflects the light to an AF sensor placed at the bottom of the mirror chamber. The sensor (or a number of sensors) analyze the incoming image and send a proper adjustment signal to the focusing motor, which in some systems is a part of the camera, in others — of the lens itself. The process runs in a feedback loop, i.e. any adjustment leads to further ones until the system is happy with the result.
This may seem an odd, convoluted and mechanically complicated solution, but it seems to work better than any others tried in the past. Originated by Minolta in the 1980's, it has been generally accepted since. The first, and for a good while the only, maker to put the AF motor into lenses was Canon. Now this seems to be the dominant approach, and even Nikon is gradually moving towards it. The newer Nikkor lenses, with the motor inside, will not work with some older cameras; while the newer bodies will not work with older lenses, depending on a mechanical coupling to the motor placed in the body. That's why the recent D40 (or D40x) will not autofocus with older lenses. Phase detection usually works better and faster than the competing method of contrast detection, as the system knows both the (rough) magnitude and direction of the adjustment needed. Actually, the official specs sheet refers to the AF in the E-510 as "phase-contrast detection". It remains unclear if this really is a hybrid system (something I've never heard about except for a casual use in some Japanese sources) or just a linguistic slip. Most probable the latter. The AF performance of the E-510 seems to be somewhat improved from the E-500, although I haven't run any systematic comparisons between different body/lens combinations, and I'm not planning to. |
|
Number of sensors:
Three |
When this became known, all Olympus discussion forums declared a day of national mourning: How come, the Pentax has 11, the Canon 9, and we've got just three!
Well, if under some circumstances having more AF points would be nice (see below), for most applications one is enough, as long as the system is precise and fast, and as long as the photographer knows where he or she wants to have the focus. Point the camera, lock, shoot. Multiple points are, more often than not, used for pointing the camera in the general direction and letting it decide. Even if the AF point actually used is shown in the finder, the only thing you can do is either re-compose the frame (but why? I liked it the way it was!) or switch to a single focus point. The only applications for which I would like to have multiple AF points are those with critically shallow depth of field, usually macro, and usually shot from a tripod. I would then still use a single point, but being able to choose which one. These are cases when re-pointing of the camera is not feasible (tripod), or when the distance to the desired point of sharpness is significantly (in terms of DOF) different than the distance to the plane containing that point and perpendicular to the lens/image axis. Remember the Pythagorean theorem? If our point of interest is three feet from the axis, and its distance from the lens (or the nodal point) five feet, that plane is only four feet away. Re-pointing the camera will set the focus at five feet instead of four, as it should. The sensors in the E-510 are aligned in a horizontal line; the central one is sensitive to both vertical and horizontal patterns; two others, placed about a third of the way towards the edges, to horizontal ones only (assuming you hold the camera in the horizontal position). The central sensor is of a cross type (two combined, crossed strips); I would imagine an array sensor (like the ones in Canon 1D or Nikon D2X) being too expensive for this class of a camera. The Popular Photography report on the E-510 says: In field tests, we found all three zones sensitive to both horizontal and vertical details [...]. This is simply not true (maybe the writer was doing a copy-and paste job re-using some other review?); I've checked that multiple times with results clearly showing that the side sensors react only to horizontal lines (unless, of course, you rotate the camera by 90° around the lens axis). The E-510 allows you to select a given AF point, or let the camera decide; the choice is done via a dedicated button at top right, marked as [...]. If the focus is achieved, a red LED at the used sensor's position in the viewfinder will briefly light up, so will the indicator in the finder's info panel, and a beep will sound (unless turned off). The red diode seems to be disabled in the continuous focus mode. A failed AF operation is signaled only by blinking green AF indicator in the viewfinder. Things change a lot when you are using the electronic preview; this is described in the Live View section. |
|
Autofocus EV range:
From EV 0 to 19 at F/2 |
This, like the AE range, is valid with a lens of maximum aperture of F/2.0. Like in that case, it can be translated to a better form: the AF will work for light levels requiring an exposure of not more than 4 seconds at the full aperture of the lens used. This claim is close to my findings, as long as the camera has enough detail to focus on. Note that the lower limit is one EV below that for the AE range.
See also the focus-assist note further down. |
|
Focusing modes:
|
The continuous AF mode keeps following the object (i.e. re-focusing) from the moment the release button is half-pressed until the shutter is actually fired (more exactly: the mirror goes up). It is a predictive system, extrapolating the subject movement into a predicted position at that moment. The system seems to work fine, although I still need to give it a better try to say more. One day.
Both single and continuous focus can be, it you choose one of the "plus manual" modes, adjusted by hand with the electronic focusing ring. Frankly, I never felt a need to do it on any of my cameras; maybe I'll start now, with the MF rings on the new "kit" lenses being so much better. The manual focus mode means focusing with that ring, with only the viewfinder (or Live View) as a feedback. I use manual focusing rarely (mostly with legacy, MF lenses), as the tiny viewfinder is not really helpful here. The only circumstances under which I ever resort to MF with AF lenses is when the camera has no detail to focus on (for example, astrophotography). Still, sometimes I switch to the MF mode, if only to use AF "on demand". You can assign this function to the [Fn] button and it is sometimes very useful. For example, when I'm taking a series of almost-identical pictures at the same focal length, but changing some other parameters, I may not want the camera to autofocus every frame: this may introduce extra variability between different images. Switching to MF and using focus "on demand" before the first frame (or every time the focal length is changed) solves the problem in a clean way. Now the bad news. Olympus decided to keep away from the E-510 the function I liked so much in the E-500: focus bracketing in the MF mode (most practical used with focus "on demand", see above). Why? As soon as I find a feature I'm thrilled with, some marketing guy decides that nobody will never need it. Just this one feature! Some of the Olympus specs sheets still list this feature. Either a cut-and-paste job from the E-500, or the focus bracketing was removed in the last minute. The manual does not mention it. Two features are missing from the focusing options. The first one is switching the focus to the hyperfocal distance. For a given aperture and focal length, that's the focus setting assuring that everything from half that value to infinity will be acceptably sharp. This would be very useful in landscape photography, where setting the focus near infinity is not always desirable: half of the depth-of-field range is wasted. The second such feature is some sort of depth-of-field autoexposure automation. When I'm shooting a house with flowers at the foreground, it would be nice to point the AF at both and let the camera, compute the focus distance and aperture needed to render both acceptably sharp. While I don't need this feature often, when it happens, I need it badly. It has been provided in the Canon 400D, and the Four Thirds lenses provide the camera with all necessary information: it can be seen in the EXIF data. |
|
Autofocus lock:
Yes | Normally, autofocus is locked together with autoexposure by half-pressing the shutter release. This can be, however customized to your liking as I've described in the AE lock section. |
AF release lock:
|
What it means, is that the shutter will not fire in the single AF mode if the autofocus was not achieved, but in the continuous AF mode it will regardless of that.
This can be also customized to your liking, although for me the defaults make most sense. |
|
AF assist beam:
No; flash used instead |
At lower light levels the built-in flash can be used as a focus-assist light; there is no separate lamp for this purpose like in some other camera models.
This feature can be used even if the flash is disabled (it has, however, to be raised). It works OK, although I find it annoying and never use it. The Olympus dedicated flashes (FL-36, FL-50) provide a built-in, deep-red AF-assist light which also can be used. That is better. |
|
Internal:
GN 12 m at ISO 100 |
This is about 15% less light output than in the E-500 (subject to rounding errors), and close to what other cameras in this class offer. The flash provides coverage sufficient for a lens of a 14 mm focal length (equivalent to a 28 mm lens on a film camera).
By default, the flash pops up by itself in the Auto flash mode, unless you modify one of the preference settings, which usually is one of the first things I do with a new camera. When I decide to use the built-in flash (which is only for fill-in, or in emergencies), I raise it by pressing the flash control button to the left of the prism hump. Strangely, I've seen quite a few camera reviews, complaining about the missing auto pop-up feature on this or that SLR. This is a misunderstanding:
|
|
External:
Olympus dedicated flash system |
This system, at present, includes three units: FL-50, FL-36, and FL-20, plus a ring flash and a dual on-lens one. All work with the E-510, although most users will probably find the FL-36 the most practical choice.
Unfortunately, the built-in flash cannot be raised with any unit mounted on the hot shoe. This stops it from being useful as a fill light with such a unit bounced off the ceiling. Neither FL-50 nor FL-36 have a second, fill-in head, so this capability would be very helpful (it was with the E-300). For more, check my articles on the FL-36 and E-System flashes. |
|
External connections:
Olympus dedicated hot shoe |
The camera does not have a flash socket, but there are accessory cables available to facilitate hooking up a flash on a bracket to the hot-shoe contacts. (These cables also block the internal flash.)
Third party non-dedicated units (as well as the older FL-40 by Olympus) will work with the E-510, but the camera has to be in manual exposure mode, with the flash using its own thyristor circuitry to meter the light. You can be assured of good exposures, having more control over the process than with a dedicated flash. The only problem deterring many users is that you have to read the flash's manual. Actually, I have both the FL-36 and an inexpensive ($50) thyristor flash from Adorama. While the FL-36 is nicely integrated with Olympus cameras, the other one provides more light, a second (fill) flash burner, and more flexibility — and the results are consistent. The camera knows nothing about the non-dedicated unit (it will still trigger it), and has to be set to manual exposure mode, with a shutter speed not exceeding the maximum limit (see below) and aperture as expected by the flash. Do not ask me about particular models, including dedicated units from third-party makers. I haven't tried any, so I do not have any useful information. The remainder of the flash section deals only with Olympus dedicated flashes, or the built-in one. |
Flash modes:
|
This is all you can expect; it is hard to come up with anything else.
Slow modes are used to provide a mix of flash and ambient light. You have to have some experience here, or start experimenting. The first-curtain synchronization fires off the flash as soon as the shutter is fully open (i.e., the whole sensor uncovered); the second-curtain one — in the last moment of the fully-open state. (The flash burst can be assumed to be instantaneous for this purpose, as it is much shorter than the full opening time.) In the first case (default), any motion streaks due to the subject exposure by ambient light will precede the flash (frozen) component; in the second — follow it. Off disables the built-in or external flash (even if it is raised or turned on). The internal unit, if raised, will still be used for focus assist. |
|
Flash compensation:
From -2 to +2 EV. |
One of the preference settings allows you to decide if the flash compensation as set by the camera is applied on top of or instead of the regular exposure compensation, and the adjustment step can be also customized (.3, .5, or 1 EV).
This compensation is accessible by pressing the flash button while the [+/-] one is held down; the control wheel is then used to dial in the desired value. You can also do it from the (full-mode) Control Panel. The FL-50 and FL-36 dedicated flashes also allow for flash exposure compensation to be set with use of a dial on the flash itself. This is always applied on top of any corrections set on the camera. |
|
Flash metering:
Through-the-lens pre-flash. | Just a split second before the picture is actually taken, the flash emits a single pre-flash. This, reflected from the subject and metered by the camera, is used to set the exposure. |
|
Slave flash option:
Yes. |
The metering pre-flash described above will trigger prematurely any slave flash units in the neighborhood. They will therefore miss the right moment. The only way to avoid that is to use the external dedicated flash in the non-TTL auto mode, as if it were a third-party thyristor unit. The internal flash has manual settings (1, 1/4, 1/16, and 1/64 of full power), which, in order to be accessible, should be enabled in camera customization process. These can be used to trigger any slave units, as the flash is not metered then. The used aperture may have to be adjusted to reflect this input (or the intensity should be so low that it becomes negligible compared to that of the slave units. The E-510 (like any other E-System camera so far) does not have any option for wireless-triggered, multiple flashes, co-operating in terms of exposure. I know a number of studio photographers using anything from the E-1 to E-500 with multiple-strobes without complaints; still, such a wireless setup would be a plus (if I could ever afford it). |
Max. flash synch speed:
|
The second value is not claimed by Olympus, but it holds on all their E-System bodies I've tried so far, at least with direct (non-bounced) flash used from moderate distances.
When a thyristor flash is used well below its maximum light output, the light burst is shorter: it will fit within the shortest time when the focal-plane shutter is fully open. This, in the E-510, happens just above 1/320 s. When the flash is used near its maximum capacity (large distance, small aperture, bounce), the burst may be still going on when the shutter begins to close, causing an effect similar (if less pronounced) to that in the second example. With the dedicated (or internal) flash turned on, the camera will not allow you to set any speeds higher than 1/180 s, unless you switch to the Super FP mode, see below. In the Super FP mode, instead of a single, short light burst the flash generates a series of smaller ones, together covering a time span longer than it takes the shutter to travel the whole frame height. This approximates a uniform (time-wise), continuous light well enough that the camera may use any shutter speed all the way up to 1/4000 s. A price paid is that the effective flash intensity (guide number) is much lower, and more energy is being used. I've estimated that the flash needs to produce at least 200 such bursts, but possibly the number is higher. The Super FP mode can be useful when the flash provides a fill in bright daylight, when a fast shutter is needed. Note: in just one camera we have Supersonic, Hypercrystal, and now Super FP. How about at least one Ultra and maybe a Giga? The competition does not sleep! Well, at least we can use Ultra or Extreme memory cards from SanDisk... |
|
Power source:
One BLM-1 Li-Ion battery |
This is the same battery as the one used in all previous Olympus E-System cameras except for the E-400 and E-410, which need a more compact version of smaller capacity.
According to Olympus, the battery will last through about 650 frames (estimated using the common CIPA standard, without the Live view or image stabilization, but with partial use of flash). My casual experience (also without those two power-hungry features used) suggests the battery in the E-510 delivers less: something like in the E-500 (which was CIPA-rated at 400). This would still be a good result, nothing to complain about. Besides, these are no hard data, just impressions, and I may still have to eat my words when I gain more experience with the camera. In any case, another BLM-1 is the first thing a new owner of an E-510 should get. See also my note on the LBH-1 battery holder below. |
|
Energy stored:
10.8 Wh (1500 mAh at 7.2V) |
This is one of the larger-capacity batteries used in the industry, and I'm glad it is. It weighs 75 g, which is also near the top of the range.
For comparison, the EN-EL9 used in the Nikon D40x holds a charge of 1000 mAh at 51 g, and the NB-2LH used by Canon 400D — 720 mAh at 43 g. The E-410 also uses a smaller battery, BLS-1, storing 1100 mAh at 46 g. All this data is quoted from product manuals; the numbers published in various Web articles may differ wildly. For example, some reviews quote the Nikon battery weight as 17 g, which is just hilarious! |
|
Charger:
BCM-2, included | The same as the one included with many previous Olympus cameras. It recharges batteries quite slowly (about five hours, starting from empty), but this is better for battery longevity. A faster, optional BCM-1 charger is available, but your batteries may suffer. |
Additional power sources:
|
The optional LBH-1 battery holder is, actually, the only power option for this camera. It takes three CR123 or CR123A single-use lithium batteries, which are widely available in most drugstores. This, in spite of much smaller capacity, makes this holder a good fall-back in case your Li-Ion batteries (or charger) die while you are far from home.
External power supply and battery grip are options I don't care much about; neither do most camera users. SOme will, however, miss these accessories. |
Type and size:
|
Note the quotes around "pixels". This is because it is common in the camera industry to count every RGB sub-pixel of an actual pixel separately. Using the same practice to define the size of your XGA screen would result 3072×768 "pixels" (instead of 1024×768). A dishonest practice, I would say.
So, what is the real resolution of this screen? Divide 230 by three: about 77 thousand pixels. Each group of three vertical sub-pixels is approximately square, so the pixel pitch is the same in both directions. With that assumption, the resolution is 240×320 pixels. This, actually, is not bad: 50% more in each dimension than the pictures at the left. Other recent SLRs have a similar monitor "pixel" count, sufficient for most purposes. (The E-500 had a bit less: 210,000.) Anyway, the display is good-looking and readable, a pleasure to use. One thing I'm still missing is anti-reflective coating. This would make it a bit dull (a setback on a consumer market), but more useful in bright outdoors light. I still have to find a camera monitor which would really deliver under those conditions. |
Display modes:
| Switching between these modes is done with use of buttons on the camera's back. The Live View is a distinguishing feature of this camera and is discussed separately. |
Control Panel data:
(*) Only in full info mode.
|
Lots of information, but arranged in a logical and readable mode. This looks almost exactly as the original Control Panel on the E-500, with which I was so delighted, and I'm glad Olympus was not trying to change it.
Switching between the full and simplified versions of this panel, or turning it off is done with the [Info] button at the bottom left. The full version shows some additional information (marked with asterisk in the list); it is also a bit more crowded than that on the E-500, because it also includes the date (on the E-500 available only in the simplified version). You can no longer select between two color schemes, but the sole one implemented is good-looking and readable. I am mystified, though, by the empty monitor space left above and below the Control Panel: this is a valuable real estate, and it could have been better used. The major advantage of this Control Panel is that it is used not only to show the camera parameters, but also to change them. Once the [OK] button is pressed, cursor keys can be used to navigate between all settings (visible at a glance), and the currently highlighted one can be then adjusted with the control dial. This may sound like no big deal, but in practice the system is much better than adjusting the setting via the menu system; there is just no contest. Actually, with this system in place I could live without most of the buttons used for direct access to some of the settings. Someone at Olympus also thought so, and in the E-410 this really happened: the cursor keys no longer double up as direct access ones, and the two buttons at the top right were removed. This does not, for me at least, negatively affect the camera's operation. While the reference WB no longer can be assigned to the [Fn] button, the role of the latter has been (secretly) assigned to the left-arrow one, so no harm is done, and the external controls have been streamlined. The aperture and shutter speed are displayed in larger characters on the top of the Control Panel, and the exposure compensation is shown both numerically and graphically, with the scale showing both the "regular" and flash adjustment, if applicable. The Control Panel can be also activated by pressing the [OK] button. This will, however, be only the simplified version (I would like this to be a selectable preference). The difference between this and using the [Info] button is that now the panel will go away if the shutter release is half-pressed or upon the control wheel time-out. You can also close it by pressing [OK] again twice (the first press will bring you the "full" adjustment screen for the selected parameter; a feature I could live without). Once again: an excellent job, making the camera faster, easier and more enjoyable in the field. The price paid is extra battery power used (to limit that effect, the backlighting has an adjustable time-out). With all my accolades, there are some improvements which the Control Panel could use to max out on its advantages.
An eyepiece sensor, turning the panel off when the camera is brought up to the eye would be also a nice addition. |
Image review:
|
By default, the image just taken is (with a negligible delay) shown on the screen just afterwards. The display duration is adjustable (all the way to being disabled), and the camera uses the currently active display mode.
While it would be handy to be able to delete the picture during that review, this can be done with just two key presses: [Play] (green arrow) and [Del], as the Play function response is very fast, with no noticeable delay. The regular image display can be activated at (almost) any time by pressing the [Play] button. This recalls the last image taken, and the arrow keys can be then used to scroll through images. The [Info] key is used to switch between various display modes, differing in the amount and kind of information shown. In the detailed display mode, the image is reduced to 1/4 of the screen (including the indicator of the AF sensor used), and adds most of the relevant picture-taking information. It also shows four, small but useful, histograms: luminance and individual RGB components. RGB histograms are useful in analyzing images of deep-colored objects, where the luminance may stay within limits, with just an individual RGB channel overloaded. This happens to me sometimes in pictures of flowers, where a seemingly fine exposure may still end up with one channel being overexposed, so that areas of that color loose all detail. This is difficult to spot on the monitor. The modes showing clipped highlights and shadows are also useful, blinking the affected areas. This will identify burned-out areas too small to be noticed in a histogram. I wish both were implemented in the same step (blinking in different colors, for example), which would make scrolling through all display options less tedious. The control wheel is used to change the viewed image magnification (up to 14×) or to enter the thumbnail viewing mode (plus a calendar, allowing to jump to pictures from a given day). When an image is magnified, the [Info] button acts a bit differently, switching between three display modes: just magnified (arrow buttons still move between images, preserving the scale), magnified/scrollable, and full-screen with a frame showing the selected fragment. In the last two, arrow buttons move the selected fragment around the frame. The [Fn] button pressed in the image display mode jumps straight to the 10× magnification, also toggling between these three states. This is handy, but I rarely remember it. In a similar way, the AF point selection button, [...], is used to show the a fragment of currently selected image in a split-screen mode next to a similar fragment of another frame, which can be selected with the arrow keys. Some other display options are also accessible in this split-screen mode, but I don't find it too useful because it is quite confusing. All button functionality becomes strongly modal: it depends on what state you're in, so you often end up doing something else than what you intended. Modal user interfaces are, by nature, evil, and should be used only in cases of extreme need. As powerful as this function may be, I never saw anyone using it in practice: too complicated and too confusing. Unless the interface is completely redesigned, less is more. During the picture review, the E-510 does not show the original image, but a special "preview image" stored additionally inside the image file (see File Format and compression above). That "preview image" is 1600×1200 pixels. This means that when you view it on the monitor (320×240 pixels) in a 5× magnification, it shows already all information available. Higher magnifications add just enlargement, without any more detail. They also amplify all compression losses and artifacts, and the "preview image" is quite heavily compressed. Still, magnifications above 5× have some use, as they allow you to view the image from a greater distance. The above is important: it means that the quality of the image review you see in the LCD screen has, in terms of compression losses and artifacts, nothing to do with that of the saved image: it is just that "preview version", staying, I would expect, the same, regardless of how you save the actual image information. So do not try to use the monitor to judge the effects of image file format and/or compression. |
|
Video output:
PAL and NTSC |
The contents of the monitor can be sent to a TV set.
There is no separate video output socket: it has been integrated with the USB connection. It is also used to connect the RM-UC1 wired remote. Its location is a bit unfortunate, right underneath the arrow-key cluster. When a remote is connected, it partially obstructs the down arrow, serving as a dedicated ISO button, and also makes accessing other controls less convenient. The location used in previous models (left-hand edge of the body) was better. |
|
The control system of the E-510 is generally well-thought and implemented. It remains basically unchanged from the E-500 which I like a lot. The basic operating principle of direct, external, controls is simple and consistent: press a button and turn the control dial (the only exceptions being display-related functions). The basic camera settings have their own buttons assigned. This, obviously, is limited by the number of buttons you can (or are willing to) place on the camera body: too many would confuse many users. This is why some features have to be accessed in a less direct way: through the Control Panel or, worse, the menu system. While the former is quite convenient and fast, using the latter can be quite annoying. Luckily, it does not have to be used often. This brief description excluded the mode dial, used for switching between basic regimens (manual, program, etc.); see below. As mentioned before, the monitor can be used as a Control Panel, which not only displays the more important settings at a glance, but is also used to modify them without using the menus. Now, let me dig into some detail. As it is common, the mode dial has notched positions for Program, Aperture and Shutter Priority, Manual, and five Scene Modes, plus two more: Auto and Scene. While Auto basically reverts most of the camera settings to default values, Scene gives you an access to 18 non-adjustable "creative idiot" modes, briefly discussed in the section on exposure control. If you made it this far into this article, then you will not want to use those. For more on the Auto position refer, again, to the section on exposure. The mode dial is quite stiff: it may make it feel less pleasant, but turning it accidentally is almost impossible. Below it, there is a collar with the power switch, also well protected from accidental activation. Direct buttons and control wheel These are the buttons used in combination with the control wheel to adjust various settings. All except three sit on the back of the camera; the exceptions are exposure compensation, flash, and drive mode, which are on the top.
The four arrow keys can be also used as direct buttons when the menu is off and when there is nothing highlighted in the Control Panel:
The direct buttons do not have to be kept pressed while the control wheel is being turned. There is a "grace period" for that, adjustable from the settings menu. Some users may find the dual use of arrow buttons (which is a modal design, although not a really bad case) non-intuitive. They may disable that from the settings, so that the arrows will function only as arrows. The functions will still be accessible from the Control Panel which is as convenient and almost as fast. Your choice. Only two of these are used in picture taking:
The remaining ones deal with monitor functions, and are placed to the left of the LCD:
The menu system in the E-510 is not worse than in most other digital cameras I've seen, but also not better. It is, to be frank, fairly messy. Its main advantage is that you will not have to access it often. | |
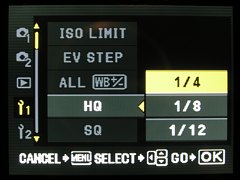
|
There are five menus here: With this number and not the most logical arrangement, it is often difficult to say in which menu to look for the option you need at the moment. |
|
With almost two years of experience with the E-500 (which uses the same system with very few differences), I find myself going through 25 (yes, that's twenty-five) options of the Setting 2 menu, only to discover that what I need is item number 21 in Settings 1. A well-designed user interface should never offer more than ten or twelve choices from a single menu, especially when only five of them are visible without scrolling. If you need to squeeze more options in, you have to do some branching or re-balancing, helped by removing options which are more easily accessible from elsewhere (here: the Control Panel). As an example of total chaos, Settings 1 and Settings 2 are meaningless names. What would be wrong with Interface and Presets? This little thing would already help a lot — at the expense of designing two new icons. The way things are now, the functionality of the [Fn] button is changed from the third page of Settings 1, locking of arrow buttons from the fifth, and swapping of Lock and [Fn] buttons — from the last page of Settings 2. If there is any pattern here, then I must be blind. In a perfect world none of the shooting parameters would be accessed from the menu system, which could be left for user preferences and other customization. Olympus is very close to that goal, with only bracketing, noise reduction/filtering, and mirror lock left. As I've already suggested, mirror lock can be integrated with self-timer; bracketing and noise belong in the Control Panel. Besides, only AE bracketing is important here; the other kinds can be removed with no regrets: WB bracketing is useless anyway (saving multiple files from the same shot; nothing I can't do from the original raw file), flash bracketing — of tertiary importance: it will not work in the serial drive mode anyway, because the flash will not recharge, and in single shot mode I can just adjust the flash compensation by hand, without having to watch the color of the [BKT] indicator. This would get rid of both Camera menus. Even leaving the View one intact, now we could split the two Settings menus into four, each grouping functions of a certain kind, logically assigned. Unfortunately, since 2005, when the E-500 was introduced, Olympus did not make a single small step in improving the menu interface; actually, leaving it (with minor changes but no actual improvements) where it was in the E-300, back in 2004. And this is disappointing in an otherwise very attractive camera. This part of the user interface looks like it was designed and developed by an entirely different team than the menu system I've just criticized (well, maybe it was!); I cannot praise it enough. The panel can be entered by pressing the [Info] button, which is also used to switch between the simple and full versions. Then pressing [OK] switches the panel to the active mode, where one of the fields is selected (highlighted). Arrow keys are then used to move the selection around, and the control wheel changes the value of the selected parameter. Simple and efficient. If you prefer, you can press [OK] again instead of turning the wheel, to see all the values to choose from, also with use of the control wheel. To remove the selection, press [Info] again, half-press the shutter release, or just do nothing for a few seconds; the panel will switch back to the passive mode.
The full listing of settings shown in and adjustable from the Control Panel was given in the LCD monitor section, so I will not be repeating it here. The only things I'm missing is access to autoexposure bracketing and noise filtering/reduction, as already mentioned in the section on menus. I've been hoping for those additions since 2005, so far in vain. The dual viewing system in the E-510 is a big topic; that's why this is not a part of my specs table, and that's why I decided to include its description only after having described everything else in this camera. I'm afraid this section is rather long; but this is the first time I'm writing in detail about a camera with this feature, and I want to leave no stones unturned. When this article becomes presentable, I may decide to remove large parts of this description to a separate article; for the time being let me just throw everything on one heap... The first digital SLR allowing for live electronic preview was the 1.5-megapixel Sony D700 of 1999; Olympus followed in 2000 with the ambitious E-10 of 2001. Neither camera had interchangeable lenses, though, and instead of a flipping mirror they were using a beam-splitting prism, sending some light to the sensor, and some — to the groundglass screen. Both lines were abandoned shortly (after one update each); the market did not seem to want a fixed-lens SLR. (In the original version of this article I wrote the E-10 was first; not true. Thanks to John McLaggan for correcting me on this.) The next attempt at providing the same functionality was also by Olympus, in their E-330 of 2006. This camera (still in production as of August 2007) provides not just one but two different ways of live preview: one using a second image sensor behind a series of semi-transparent mirrors (see here), and one utilizing the main image sensor, which requires the mirror to be brought up and the shutter to open for viewing. The E-330 has a dedicated, if small, following, and has been used as a baseline for related models by Panasonic and Leica. Then, in 2007, the feature returned in three cameras: the E-510 and E-410 siblings, and the professional Canon EOS D1 Mk. III. Another Olympus SLR, the pro-grade E-3(?), expected later this year, will also have live preview. While the D1 will not, by definition, become a mass-market item, the Olympus cameras may, and this will change the digital DSL field forever. In the above, I skipped the modified Canon 20D, named 20Da and aimed at astrophotography and infrared markets. It had limited availability, and the live preview was limited to about half a minute, under a risk of damaging the sensor. The camera is no longer being made, and it had no successor. The problem with electronic viewfinders on SLR cameras is that they are not designed to replace the main (through-the-lens) viewing system for general use; that system is, anyway, better than EVF. They are being included for those rare occasions, when they may be more useful than the regular SLR viewfinder. If you try to bring your EVF viewing habits to such a camera, you will be disappointed. That's why so many users and reviewers are so unhappy with what Olympus or Canon are offering in this department, while both companies do quite a good job with this special-purpose alternative. If you are among those people, then reconsider: most probably you do not need a digital SLR, but an EVF camera, and there are quite a many good models out there. Actually, the camera operation and user interface depend on which viewing mode are you using; this is like two different cameras sharing the same body, a typical case of split personality, with the dominant one being an SLR and the other surfacing only occasionally. Keep that in mind. In order to activate the Live View, you press a dedicated button to the right of the LCD monitor. This triggers three almost simultaneous actions:
Note the last remark on exposure information. That information is not derived from the actual autoexposure system (now obscured by the raised mirror), but from a secondary one, using the data from the image sensor. This system works differently; even if calibrated properly, it will show only approximate data, which will not be used for picture-taking; for that, the camera's "real" AE system will have the last word. In one situation that disparity becomes substantial: shooting through an infrared filter. Because the sensor responds to these wavelengths very differently than the main AE system, both will show very different results. Under typical sunny conditions the shutter speed I see in the Live screen may be sixty second or so, while the actual value, set by the AE system just before the picture is taken (at the same aperture), will be one second. I do not consider this a problem. The camera's task is to work properly in visible light. It is not designed to work in infrared; that's just a nice extra. Besides, it does not affect the actual metering — just the preview of exposure parameters. Now, when you press the shutter release, the camera has, for a short while, to switch to the "regular" viewing mode, before the picture is taken:
Once both AF and AE functions are performed (assuming they are activated), a normal shooting sequence is activated: mirror up, shutter open for actual exposure, shutter closed, mirror down, image processed and saved. done. After that the camera returns to the Live View mode going through all steps from the first list at the top of this section. Complicated? You bet. But there is no way around it, if we want to use the same sensor for preview and actual picture-taking. These are very different tasks, and the camera has to be set up properly for each one. In non-SLR cameras, which almost always offer live preview, the process is simplified by the absence of the mirror, so that all this slapping will be avoided, but if the camera has an actual shutter (as opposed to electronic gating), the shutter has to close, then open and close for the exposure, then open for viewing again — also lots of activity. The process is additionally simplified by the fact that exposure and, usually, focus are also determined with the image sensor itself. In principle at least, an SLR camera could also use the sensor itself for both autofocus and exposure metering. This would eliminate any need for the mirror to go up, although the shutter would still have to close before the actual exposure. I doubt this is feasible at the current state of art, but, cost and complexity aside, it may be something we see in the future. Another two or three years? People who complain about the long, noisy, and sluggish shooting in the Live View mode could try a mental exercise of coming up with a simpler solution — not a working one, but just a principle. They also do not understand that this mode is not a replacement for the regular one, but an alternative to it, having an advantage under special circumstances — and only then should it be used. An informed criticism is meaningful and stimulating; one arising from ignorance — just silly and useless. The E-510, indeed, becomes an entirely different camera when in the Live View mode. THis affects not only the process of viewing and picture-taking, but also the options and adjustments available, and the way the camera responds to the user interface. A big change occurs, obviously, in the process of focusing. If autofocus is used it has to be explicitly invoked in order for the monitor preview to became sharp. This is done by pressing the Lock mutton, [AEL/AFL] (so it no longer retains its usual functionality as described above). When you do that, the following happens:
Other user actions may also cause a temporary return of the mirror; for example, invoking the menu system or reviewing an image on the card. This is done, at least in the former case, without a convincing reason; perhaps because of some technical difficulties or just design convenience. The mirror will also return down when you power the camera off while it is in the Live View mode (in this case, obviously, it will go up again as soon as you turn the camera on). While Live View is on, the [Info] button toggles between various display overlays:
| |

|
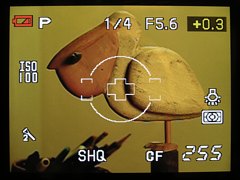
|
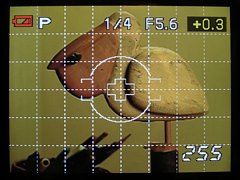
| |
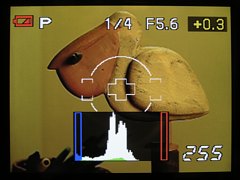
|
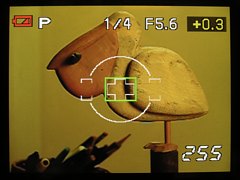
|
|
|
That's quite a few states, and I am not a big fan of long toggling sequences like this one. The direct buttons, control wheel, and other controls behave the same way as in the non-Live camera mode, with two exceptions:
Note that the Control Panel becomes inaccessible at all in this last display state, as the [Info] and [OK] buttons now perform different functions. To gain access to it, you have to scroll to a different state and only then press [OK]. Under some circumstances the Live View may become quite dark and noisy. This can be helped with a feature referred to as Live View Boost, accessible from one of the Settings menus (I will never remember which one; this is hopeless!). Olympus is not clear on what principles this feature is based, but it works as advertised: the preview is, indeed, more readable. The documentation does not even mention what are the disadvantages and/or limitation of using the boost. There must be some, otherwise I see no reasons why the feature could not be permanently enabled. When I learn something, I'll update this. The good thing is that Live View helps in some situations. Low- or high-angle shooting comes first to mind, but the usefulness is limited by the non-articulating construction of the monitor. Even one degree of freedom (just tilt) would help a lot, as my experience with the E-10/E-20 and the C-series cameras shows. Still, for tabletop or nature close-up applications this feature has its uses even with this flaw. I wonder why did Olympus decide against a tilting monitor. Keeping the camera's size down is the most plausible explanation; a tilt/swivel solution would be even more costly in this aspect. Cost constraints might also have played a role here. For the time being at least, my main use for the Live View is infrared, where it is a lifesaver; see my article on IR with the E-510. WIth my addiction to infrared, this may be enough to accept the Live View as it is; for other uses your mileage may vary. Still, there is always a way out: if you don't like it, don't use it (even if you paid for it), and the camera will become like all others. Live View on the E-510 is also not free from some teething problems: technical glitches which cannot be dismissed as due to the very nature of this capability. One of the most painful is the erratic behavior of the live histogram. First of all: with the boost (see above) enabled, the histogram seems to be completely useless: while being drawn and updated, it does not react at all to changes in exposure compensation. Excuse me? This just cannot be right: I dial in +4 EV of adjustment and the thing does not even budge? So what do I need a histogram for? Looking nice? But things are getting worse. With the boost off, the behavior is sometimes as expected (the histogram changes appropriately with exposure compensation), but sometimes it stops responding again, as above. Obviously, a software glitch, and, interestingly, not a single review mentions this behavior. It is always possible that something is wrong with my particular camera, but the chances are slim; this kind of a failure is not easy to imagine. With a remote chance that it was just me or my camera, in the original posting of this article I've asked the Readers who own the E-510 to let me know whether they experience the same problem. I've received eight reports confirming it and none to the contrary. Thank you all for contributing; now I'm sure it's Olympus. For the time being, I cannot trust this function and have to fall back to the tried-and-true: taking a test picture and using it to check the histogram. Maybe less convenient, but at least reliable. The camera functions and interface can be customized in a multitude of ways. While access to that customization can be quite painful (the menu system!), this is normal — it is hard to imagine an access to fifty or more different tweaks without some kind of a hierarchic interface (true, this one could've been better). Still, once you've customized the camera to your liking, you usually leave it alone. The customization options are quite complete and powerful, and they do not stand in the way of everyday shooting. For more on how to use the customization options, refer to Setting up your E-510. Examples of most useful settings include tweaks to how the autoexposure and autofocus locks work with use of the lock button and shutter release, setting the metering pattern in AEL, or assigning/swapping some button functions, all discussed above. Now, this is the proverbial pudding with the proof inside, and I was very anxious to see how the new camera, with a totally different imager and image-processing pipeline, performs.
At this moment, after just three weeks of using the E-510 I may say I'm not disappointed; see The colors are vibrant, tonal transitions smooth and detailed. The kit lenses work much better than their size or price would indicate. The biggest shock comes, however, when you disable the in-camera dynamic noise filtering: the gain in sharpness reveals a quite incredible amount of detail (and the lenses are capable of filling it in). The noise, even with filtering off, is well under control, and that's why I'm going to keep the filter permanently in that position, maybe except ISO 1600, where Low may be (just) preferable. While some noise will be visible in pixel-peeping even at ISO 100, its structure is tight and pretty, without the color component visible in Olympus cameras using CCD sensors. The results are very nice up to ISO 400, and quite good at ISO 800; usable if not impressive at ISO 1600. If you are allergic to noise, move to Low but no higher; you will be still trading off to much. From the three Picture Modes, Vivid is too vivid for my taste; the best results seem to be delivered wit the Natural setting, with contrast and sharpness additionally adjusted downwards. With that, the E-510 produces some of the most pleasing images I've seen, without any postprocessing (which I still prefer to do). Some reports indicate a slightly narrower dynamic range in the E-510, compared to the competing models and to the E-500. I cannot say much on this, having done any actual measurements, but some of my samples shot in bright, contrasty sunlight hint that this is probably true. This is not much of a problem, as the difference, if any, does not seem significant. Any camera needs a proper exposure compensation to be applied to protect the highlights; maybe with this one I'll have to watch it more closely. So far I haven't lost any frames because of that. Lowering the in-camera contrast setting will help: while it does not widen the dynamic range per se, it expands its usable central part. One impression I am getting is that the E-510 pictures do not have this kind of a magic glow which I enjoyed so much with the E-500. This, however, may be a premature statement; to be more sure I would have to use both cameras side by side under circumstances where I see (or I think I see) this glow in the older model. This will have to wait till late September or October: that's the kind of light I'm talking about. I may have then to recall this statement. All in all, the image quality delivered by this camera is hard to beat — certainly not in this price range, and possibly much higher. I say "possibly", because to make a stronger statement I would have, again, to use all cameras compared, and my experience is limited, with a few exceptions, to entry-level models from other makers. Anyway, instead of reading my verbose comments, better have a look for yourself at the samples I'm presenting in separate pages:
The camera comes with a printed E-510 Instruction Manual. It is nicely laid out and illustrated, but not really useful: most of the information it contains is what an average person would figure out by playing with the camera, while lots of reference information which would be very useful is just missing. Last but not least, the English translation leaves a lot to be desired, sometimes leading to unintended comical effects. Mind it: as a poor immigrant to the States, with English only as a second language, I'm not a purist. But, clearly, Olympus should hire someone with a better mastery of the language in general, and English photographic terminology in particular. Their cameras, and the E-510 in particular, deserve better than that. This program, now in Version 2, is supposed to be useful in a number of tasks:
As you can see, from these five functions currently only two (No. 3 and 5) are useful. One of these should be really handled outside of the program, and the other is of use only to people who save images as ORF files — certainly, this is not the group which would use the remaining features of the program. Therefore I consider the Olympus Master a "missed application": without a clearly defined goal and/or user profile. The implementation also leaves a lot to be desired. While my Olympus Master review has not been updated to this version, the only improvement I could notice is that Version 2 can now start without the infamous "Web Links" panel shown. This is not much. In addition to the camera body and the kit lenses, if any, some accessories are included in the box:
This means that you have almost everything needed to start enjoying the camera, except for a memory card (get a 2 GB Compact Flash), protective UV filters (I would recommend Hoya HMC UV at $22 or so each), and a camera bag (I have the Lowe Pro EX-140 and EX-160; they are cheap, small and good, fitting the E-510 with both kit lenses; go for the latter if you need room for one more lens). As you may know, I like the preceding Olympus model, the E-500, a lot, so the E-510 has big shoes to fill. Because of my affection to the E-500, it took me about two weeks to get used to the new model, and to start appreciating its advantages, specs sheet aside. My transition from the E-300 to E-500 was very fast: the handling and controls were much improved, with the image quality undistinguishable between these two; it was almost a love at the first sight. Now I can say I already like this camera. The ergonomics is excellent, build quality very good, results — outstanding, period. The aspect I'm most impressed with on this front is the detail rendition with noise filter off, and the noise itself is well-controlled and very nicely structured. The colors seem close to the classic "Olympus look" I like so much, but I need more time to make a definitive statement on this. The image stabilization brings a visible advantage to low-light shooting (I don't have a really long lens to try it with in broad daylight), and the Live View is a nice extra, as long as you do not try to use it instead of the SLR viewing system, but only for applications where it shows its merits. Yes, the lack of monitor tilt is a definitive minus — but no other non-Olympus camera this side of $4000 offers a live preview at all, so take it or leave it. The thing I complained most about, the menu system, is just a small fly in the ointment; I can go for weeks without ever seeing it (except when testing a new camera, unfortunately). Besides, other makers are not really better here: try Canon's Custom Functions for example. The remaining controls, inherited from the E-500, do not leave much room for improvement, at least not on a compact body like this. Other glitches and design snafus (for example, erratic live histogram, no IS support for legacy lenses), as irritating as they may be, are not enough to deter me from highly recommending this camera to, first of all, any ambitious amateur photographer in need to upgrade his/her equipment, or to finally enter the domain of digital SLR photography. (Yes, I know you, the last film hold-outs out there. Abandon ship!) Note to E-500 users: All this does not mean that if you have an E-500, you have to ditch it and get an E-510. I've got more pleasing images from the E-500 than from any camera I've used before, and, believe me, I've been around the block. Consider getting an E-510 only if at least two of the following are true:
The competition. The digital SLR market is a tough one, with Canon dominating most of it, and Nikon being second. As of July, 2007, Olympus managed to make its way to a distant third, thanks to the E-500, its best-selling digital SLR yet. Most of the SLR sales happen in the price region below $1000. While price-wise the E-510 belongs to this category, its specifications and image quality exceed anything offered there by other manufacturers, including the Big Two. This does not mean that you cannot get good results with the 400D or the D40x: I have seen many of these. It is mostly the photographer. Still, the E-510 leaves that competition behind, directly (and, in most areas at least, successfully) competing against models costing twice as much. This is a good news not only for users who already switched to the Four Thirds standard, but also to those who, for many reasons, prefer to use other SLR lines. Their makers will now have to catch up, coming with attractive responses to what Olympus offers, so ultimately everyone will benefit. I can imagine them frantically working on that, and it will be very interesting to see what they will show us the next year. As for the E-510, I expect it to sell well. I dare say this will be not because its real merits: performance and image quality, but, ironically, for the specs. This is, however, just my speculation, not a hard bit of knowledge, so that we will never know. Oh, well... |
|
Other E-510 reviews and reports I'm not trying to list all references I found on the Web, only those which I consider worthy of your attention. They are shown in no particular order.
|
|
|
My other articles related to the |
|
Evolt® and Olympus® are registered trademarks of Olympus Corporation.
This page is not sponsored or endorsed by Olympus (or anyone else) and presents solely the views of the author. |
| Home: wrotniak.net | Search this site | Change font size |
| Posted 2007/08/06; last updated 2009/06/26 | Copyright © 2007-2009 by J. Andrzej Wrotniak |
 A
A 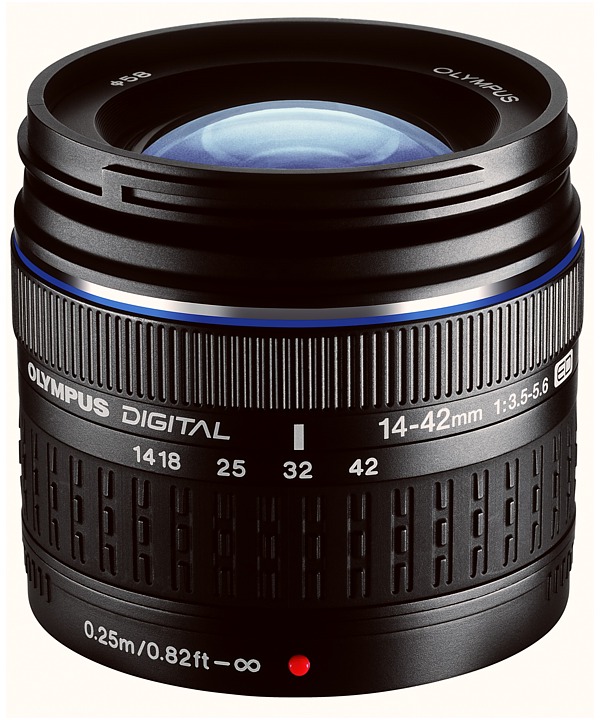


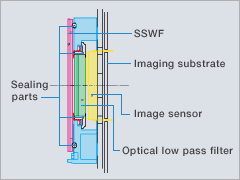


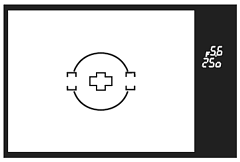

 1/320 s, non-dedicated flash
 1/400 s, non-dedicated flash